
Arc Raiders Quests Guide: All Missions, Steps and Rewards
Welcome to the complete Arc Raiders quests guide, where you can find all quests available in the game, including the latest additions from recent updates. This page provides detailed step-by-step instructions for each mission, making it easier to complete objectives and avoid common mistakes.
Each quest includes clear explanations of required tasks, along with the rewards you’ll earn after turning them in to traders in Speranza. Whether you're farming resources, unlocking new gear, or progressing through the game’s story, this guide will help you stay on track.
You’ll also find useful tips and strategies to complete quests faster, optimize your route, and minimize risk during raids. From beginner-friendly missions to more challenging objectives, everything is covered in one place.
If you're looking to complete every quest in Arc Raiders efficiently and maximize your rewards, this guide has everything you need.
Picking Up The Pieces
Objective
• Visit any area on your map with a loot category icon
• Loot 3 containers
• Visit any area on your map with a loot category icon
• Loot 3 containers
Reward
• 1x Rattler III
• 80x Medium Ammo
• 1x Rattler III
• 80x Medium Ammo
Map
• Any
• Any
How to Complete
• Visit a any Loot Zone:
Open your map and head to any area marked with a loot category icon (circles above the area name).
• Loot 3 Containers:
Once you are in the designated zone, find and open three containers. These can be supply boxes, lockers, or desks.
• Extraction:
While the mission officially tracks the looting, it is highly recommended to successfully extract with your items to secure the progress and rewards.
• Return to Shani:
After completing the objective, go back to the vendor Shani in Speranza to claim your rewards.
Clearer Skies


Objective
• Destroy 3 ARC enemies
• Get 3 ARC Alloy for Shani
• Destroy 3 ARC enemies
• Get 3 ARC Alloy for Shani
Reward
• 3x Sterilzed Bandage
• 1x Light Shield
• Black Backpack Cosmetic (Hiker Color)
• 3x Sterilzed Bandage
• 1x Light Shield
• Black Backpack Cosmetic (Hiker Color)
Map
• Any
• Any
How to Complete
• Locate ARC Enemies:
Head out into the world (Dam Battlegrounds is a good start) and find robotic ARC units like drones or small crawlers.
• Destroy 3 Enemies:
Eliminate at least three ARC enemies using your weapons or gadgets.
• Collect ARC Alloy:
Once destroyed, these enemies often drop loot. Pick up 3 pieces of ARC Alloy from their remains.
• Return to Shani:
Bring the collected Alloy back to Shani in Speranza to complete the mission.
Quick Tip: Not every enemy drops Alloy every time, so you might need to scrap a few extra robots to get all three pieces!
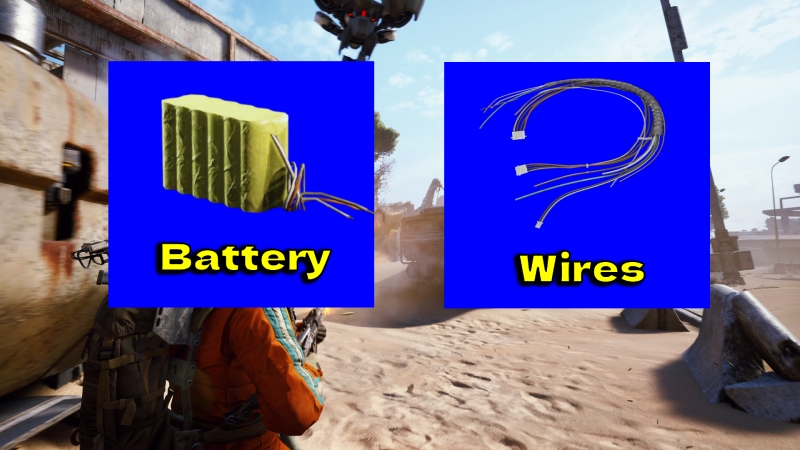
Trash Into Treasure
Objective
• Obtain 6 Wires
• Obtain 1 Battery
• Obtain 6 Wires
• Obtain 1 Battery
Reward
• 1x Tactical MK.1
• 3x Adrenaline Shot
• 1x Tactical MK.1
• 3x Adrenaline Shot
Map
• Any
• Any
How to Complete
• Scavenge for Components:
You need to find specific technical loot: 6 Wires and 1 Battery.
• Search Industrial Areas:
Look inside buildings, warehouses, and mechanical workshops. Wires are common in toolboxes, crates,
and electronic junk piles.
• Locate a Battery:
Batteries are slightly rarer. Search inside garages, near machinery, or inside utility containers (like yellow cases or lockers).
• Extraction:
You must successfully extract from the map with these items in your inventory for them to count toward the mission.
Deliver to Shani:
Once back in Speranza, talk to Shani to hand over the materials and complete the objective.
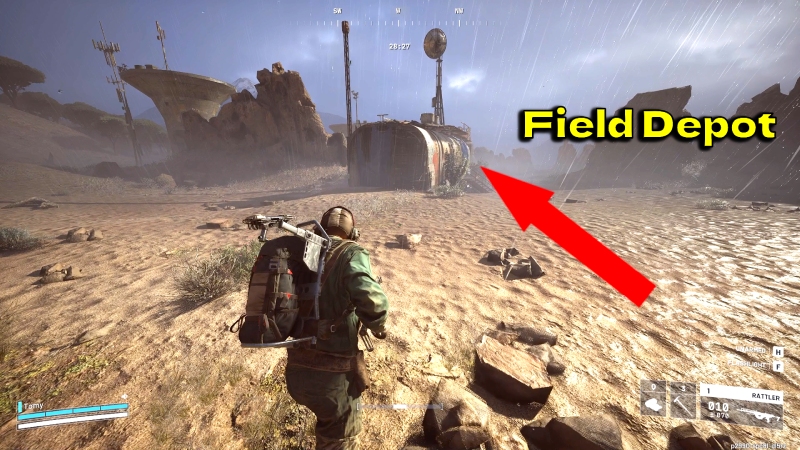
Off The Radar
Objective
• Visit a field depot
• Repair the antenna on the roof of Field Depot
• Visit a field depot
• Repair the antenna on the roof of Field Depot
Reward
• 2x Defibrillator
• 1x Black and White Outfit Cosmetic
• 2x Defibrillator
• 1x Black and White Outfit Cosmetic
Map
• Any
• Any
How to Complete
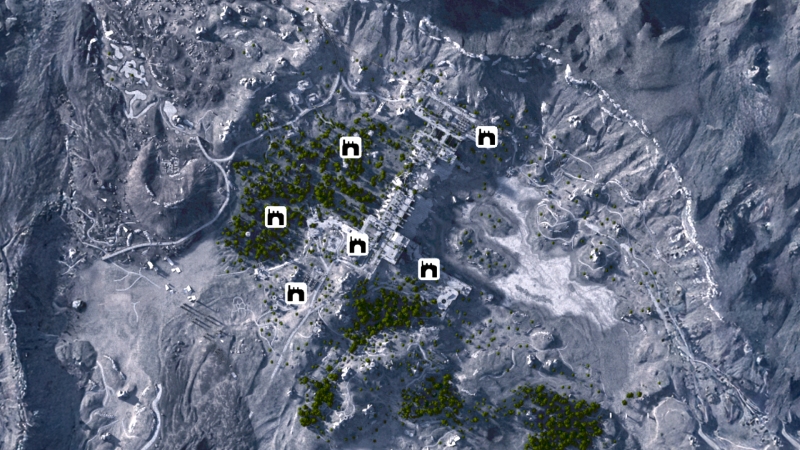
• Locate a ANY Field Depot on the map. These are fortified military outposts usually marked by a radar dish icon.
• Once you arrive at the depot, find a way to the roof of the main building.
You may need to use ladders, stairs, or nearby crates to climb up.
• Repair the Antenna: Locate the large satellite antenna on the roof. Interact with it to perform the repairs.
• Defend the Area:
- Be careful, as interacting with the antenna or being in a Field Depot often attracts ARC enemies.
- Be prepared for a fight while on the roof.
• Extraction: After repairing the antenna, ensure you extract successfully to lock in your mission progress.
A Bad Feeling
Objective
• Find and search any ARC Probe or ARC Courier
• Find and search any ARC Probe or ARC Courier
Reward
• 10x Metal parts
• 5x Steel Spring
• 5x Duct Tape
• 10x Metal parts
• 5x Steel Spring
• 5x Duct Tape
Map
• Any
• Any
How to Complete
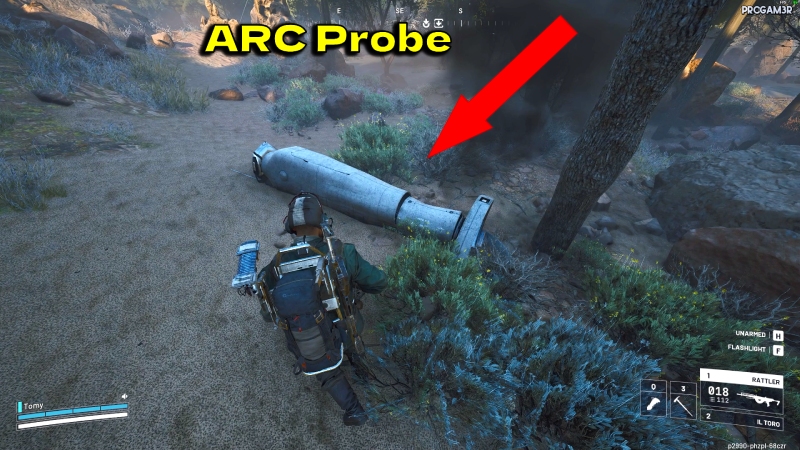
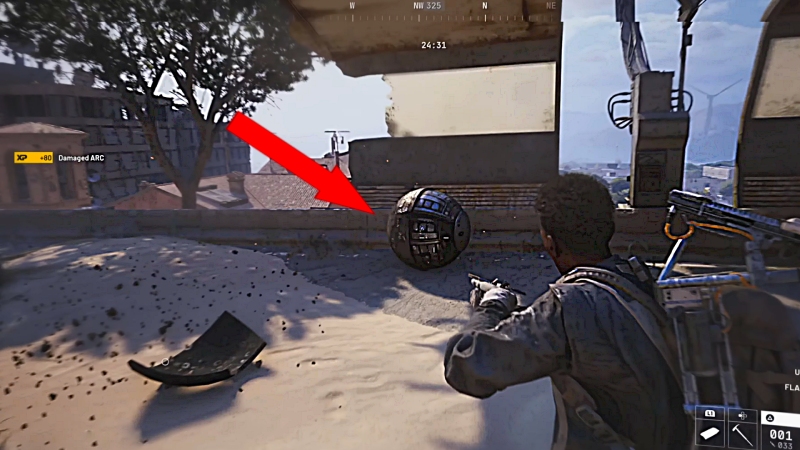
1. Locate an ARC Probe or Courier: These objects spawn at random locations across the map.
- ARC Probe:
Looks like a large, white missile-shaped pod. It emits a loud, consistent beeping/pinging sound and sometimes black smoke when it's on the ground.
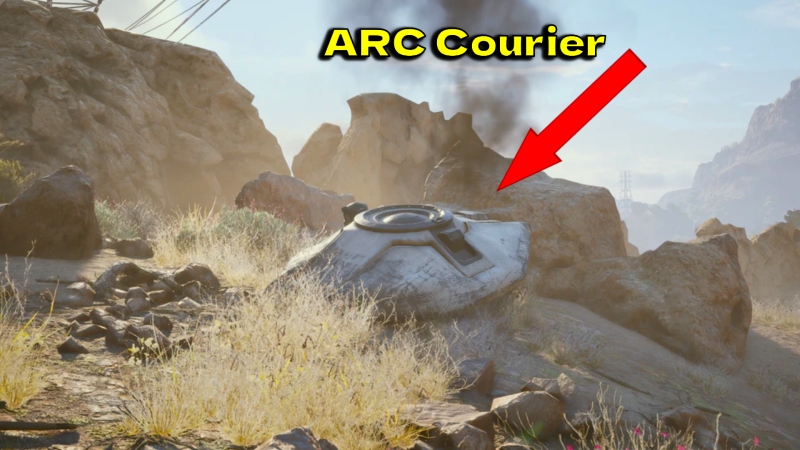
- ARC Courier:
Looks like a round, metallic UFO-like structure. They are often found smoldering or emitting smoke after crashing.
2. Breach and Search:
Once you find one, you must breach it (interact to open it). Be careful, as breaching a
Probe often triggers a distress signal that attracts nearby ARC enemies.
3. Complete the Search:
After the panels open, interact with the object to search/loot it. The quest objective completes as soon as you search the interior.
4. Extraction:
Although the quest technically finishes upon searching, you should still extract safely to
keep any high-value materials found inside
1. Locate an ARC Probe or Courier: These objects spawn at random locations across the map.
- ARC Probe:
Looks like a large, white missile-shaped pod. It emits a loud, consistent beeping/pinging sound and sometimes black smoke when it's on the ground.
- ARC Courier:
Looks like a round, metallic UFO-like structure. They are often found smoldering or emitting smoke after crashing.
2. Breach and Search:
Once you find one, you must breach it (interact to open it). Be careful, as breaching a
Probe often triggers a distress signal that attracts nearby ARC enemies.
3. Complete the Search:
After the panels open, interact with the object to search/loot it. The quest objective completes as soon as you search the interior.
4. Extraction:
Although the quest technically finishes upon searching, you should still extract safely to
keep any high-value materials found inside
The Right Tool

Image credit: arcraiders.com
Objective
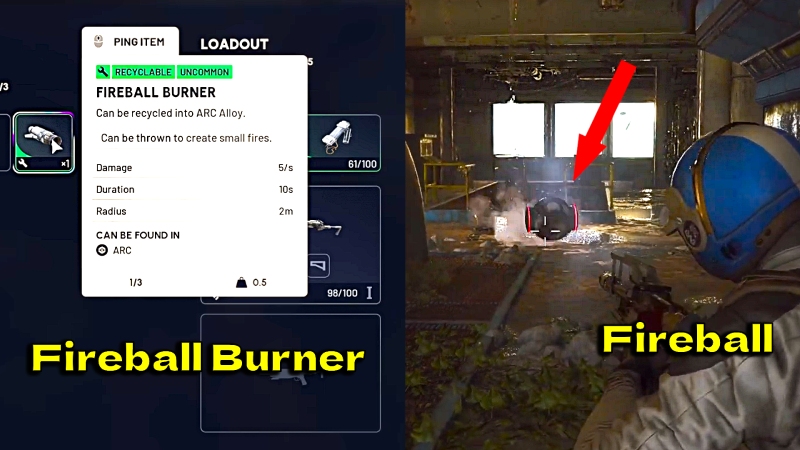
• Destroy a Fireball
• Destroy a Hornet
• Destroy a Turret
• Destroy a Fireball
• Destroy a Hornet
• Destroy a Turret
Reward
• Cheer Emote
• 1x Stitcher II
• 1x Extended Light Mag I
• Cheer Emote
• 1x Stitcher II
• 1x Extended Light Mag I
Map
• Any
• Any
How to Complete
• Hunt Specific ARC Units:
You must track down and destroy three different enemy types: a Fireball, a Hornet, and a Turret.
• Destroy a Fireball:
Look for these floating, spherical robots that glow orange. They act like kamikaze drones and will try to charge at you and explode. Shoot them from a distance before they get close.
• Destroy a Hornet:
These are flying ARC units equipped with blasters. You can usually find them patrolling near points of interest or escorting larger machines. Aim for their "eye" or thrusters to take them down quickly.
• Destroy a Turret:
Turrets are stationary defensive structures found at Field Depots or guarding high-value loot zones.
Use cover to avoid their line of sight and target their glowing power cores or lenses.
• Extraction:
After you have confirmed all three kills, proceed to an extraction point to finish the mission and save your progress.
Hatch Repairs
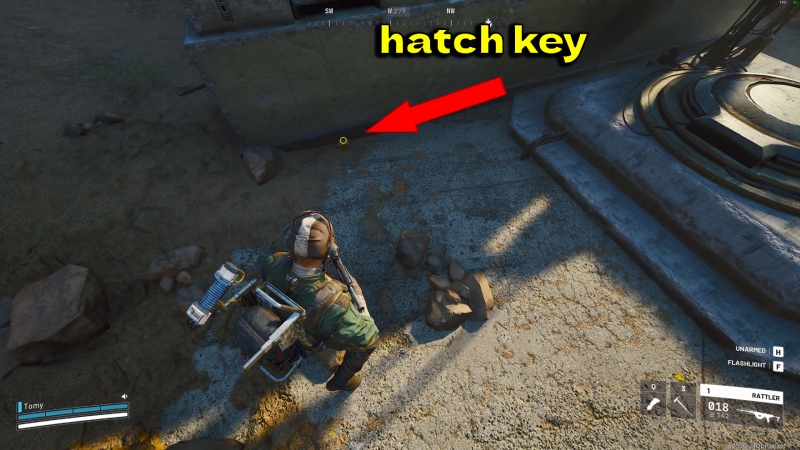
Objective
• Repair the leaking hydraulic pipes near a Raider Hatch
• Search for a hatch key near the Raider hatch
• Repair the leaking hydraulic pipes near a Raider Hatch
• Search for a hatch key near the Raider hatch
Reward
• 1x Raider Hatch Key
• 1x Binoculars
• 1x Raider Hatch Key
• 1x Binoculars
Map
• Any
• Any
How to Complete
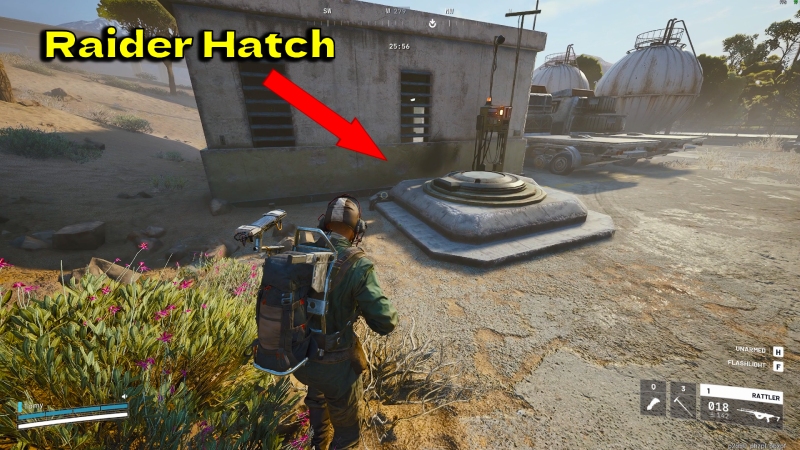
• Locate a Raider Hatch:
Head to one of the Raider Hatches marked on your map. These are circular metal entrances on the ground that lead to the underground tunnels.
• Search for the Hatch Key:
Before you can do anything else, you need to find the Hatch Key. It is usually located very close to the hatch, often hidden inside a nearby crate, toolbox, or on a corpse within the immediate vicinity.
• Repair the Hydraulic Pipes:
Look for the pipes connected to the hatch mechanism that are emitting steam or sparks. Approach the leaking sections and interact with them to perform the repairs.
• Defend the Objective:
Repairing the pipes is noisy and takes time. Be prepared to fend off ARC drones that may be alerted to your position while you are fixing the leaks.
• Extraction:
Once the pipes are fixed and you have the key, head to an extraction point to complete the mission.
Safe Passage

Image credit: arcraiders.com
Objective
• Destroy 2 ARC enemies using any explosive grenade
• Destroy 2 ARC enemies using any explosive grenade
Reward
• 5x Li'l Smoke Grenade
• 3x Shrapnel Grenade
• 3x Barricade Kit
• 5x Li'l Smoke Grenade
• 3x Shrapnel Grenade
• 3x Barricade Kit
Map
• Any
• Any
How to Complete
• Equip Explosive Grenades:
- Ensure you have Explosive Grenades equipped in your loadout before starting the raid. You can also find them as loot in military crates during the mission.
• Locate ARC Enemies:
- Find a group of machines. Weak, ground-based enemies like Tickers or small Crawlers are the best targets because they often cluster together.
• Kill with Explosives:
- Throw any of your grenade at the enemies. You must successfully destroy 2 ARC units using the blast from the grenade for the objective to count.
• Extraction: Once you get the notification that the objective is complete, head to an extraction point to secure your progress.
Down To Earth
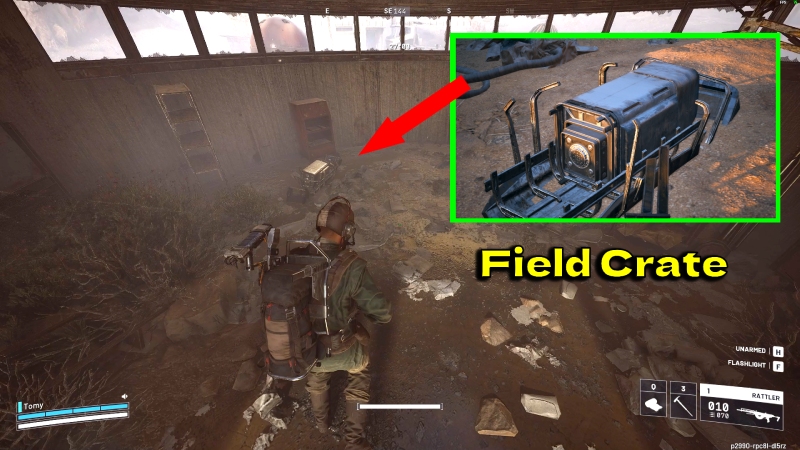
Objective
• Visit a Field Depot
• Deliver a Field Crate to a Supply Station
• Collect the reward
• Visit a Field Depot
• Deliver a Field Crate to a Supply Station
• Collect the reward
Reward
• 1x Combat MK.1
• 1x Medium Shield
• 1x Combat MK.1
• 1x Medium Shield
Map
• Any
• Any
How to Complete
• Visit a Field Depot:
- Head to a Field Depot (marked by the radar icon on your map).
- Be prepared for a fight, as these areas are usually guarded by ARC units.
• Locate a Field Crate:
- Once inside the Depot, look for a large, heavy Field Crate.
- These are physical objects that you must carry with your hands, meaning you won't be able to use your primary weapon while holding it.
• Deliver to a Supply Station in Field Depot room:
- Carry the crate to a Supply Station. These are specific delivery points (look for the yellow drop-off icon on your HUD).
- Since you are slow and vulnerable while carrying the crate, try to stay in cover or have a teammate cover you.
• Collect the Reward:
After delivering the crate, the Supply Station will provide a reward (usually high-value loot or resources).
Pick up the items to finish the task.
• Extraction: Don't forget to extract successfully to keep the rewards you just collected.
The Trifecta

Image credit: arcraiders.com
Objective
• Destroy a Hornet
• Get a Hornet Driver for Shani
• Destroy a Snitch
• Get a Snitch Scanner for Shani
• Destroy a Wasp
• Get a Wasp Driver for Shani
• Destroy a Hornet
• Get a Hornet Driver for Shani
• Destroy a Snitch
• Get a Snitch Scanner for Shani
• Destroy a Wasp
• Get a Wasp Driver for Shani
Reward
• Orange Camo Skin Cosmetic
• 1x Dam Control Tower Key
• 2x Defibrillator
• 1x Raider Hatch Key
• Orange Camo Skin Cosmetic
• 1x Dam Control Tower Key
• 2x Defibrillator
• 1x Raider Hatch Key
Map
• Any
• Any
How to Complete
• Hunt Three Flying Units: You need to track down and destroy a Hornet, a Snitch, and a Wasp.
• Collect Specific Drops:
- Hornet: Destroy it and pick up the Hornet Driver.
- Snitch: Destroy it and pick up the Snitch Scanner.
- Wasp: Destroy it and pick up the Wasp Driver.
• Check High-Value Areas:
- These flying enemies typically patrol near Field Depots, Industrial Zones, or high-tier loot areas.
- The Snitch is the smallest and fastest, often acting as a scout that alerts other machines, so take it down quickly.
• Extraction:
- You must successfully extract with all three items in your inventory.
- If you die before extracting, you will lose the items and have to hunt the robots again.
• Deliver to Shani:
- Return to Shani in Speranza to hand over the components and finish the mission.
A Better Use
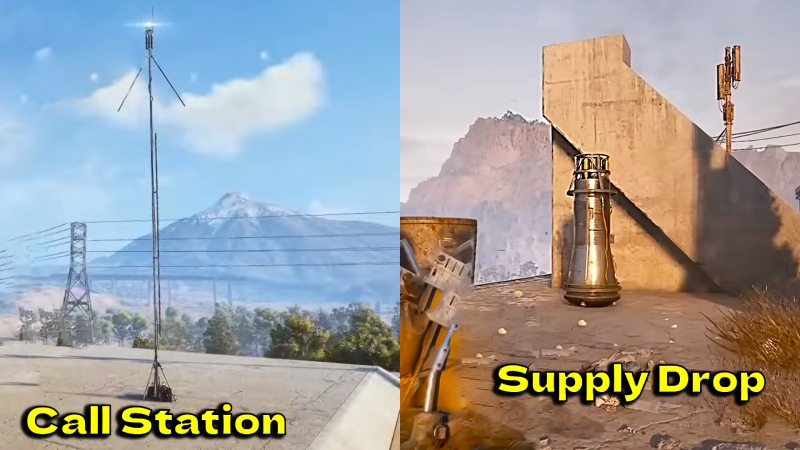
Objective
• Request in a Supply Drop from a Call Station
• Loot a Supply Drop
• Request in a Supply Drop from a Call Station
• Loot a Supply Drop
Reward
• 1x Extended Light Mag I
• 1x Stable Stock I
• 1x Muzzle BrakeII
• 1x Extended Light Mag I
• 1x Stable Stock I
• 1x Muzzle BrakeII
Map
• Any
• Any
How to Complete
• Locate a Call Station:
- Look for a Call Station on your map (typically found near outposts or high-ground areas).
- These are yellow consoles used to request external aid.
• Request the Supply Drop:
- Interact with the Call Station to initiate the request. This will trigger a countdown, and a pod will descend from the sky nearby.
• Defend the Drop Zone:
- Be ready for a fight! The sound and flare of an incoming Supply Drop often attract nearby ARC enemies or other players who might try to steal your loot.
• Loot the Supply Drop:
- Once the pod lands, approach it and loot the contents inside. You must interact with the pod to complete the objective.
• Extraction:
- To finalize the mission and keep the high-tier loot you just found, head to an extraction point and leave the area safely.
What Goes Around
Objective
• Destroy any ARC enemy using a Fireball Burner
• Destroy any ARC enemy using a Fireball Burner
Reward
• 3x Blaze Grenade
• 2x Noisemaker
• Cans Backpack Attachment (Cosmetic)
• 3x Blaze Grenade
• 2x Noisemaker
• Cans Backpack Attachment (Cosmetic)
Map
• Any
• Any
How to Complete
• Locate a Fireball: Find a Fireball enemy (the floating, orange-glowing sphere).
• Obtain the Fireball Burner:
- Destroy the Fireball. When it explodes, it often drops its propulsion/weapon core,
known as the Fireball Burner, as a physical object you can pick up.
• Use the Heavy Weapon:
- Pick up the Fireball Burner. It functions as a powerful, temporary heavy weapon (flamethrower/launcher).
• Destroy an Enemy:
- While holding the Fireball Burner, aim at any other ARC enemy (small Tickers or Crawlers are easiest)
and destroy them using the burner’s attack.
• Extraction:
- Once the kill is confirmed, you have completed the objective. Extract successfully to secure your mission progress.
Sparks Fly

Objective
• Destroy a Hornet with a Trigger 'Nade or Snap Blast
• Destroy a Hornet with a Trigger 'Nade or Snap Blast
Reward
• 1x Trigger Nade Blueprint
• 4x Crude Explosives
• 2x Processor
• 1x Trigger Nade Blueprint
• 4x Crude Explosives
• 2x Processor
Map
• Any
• Any
How to Complete
• Equip the Right Gear:
- Before starting the raid, make sure you have either the Trigger 'Nade (remote-detonated grenade) or the Snap Blast (proximity/impact explosive) in your loadout.
• Locate a Hornet:
- Find a Hornet, the flying ARC unit that patrols the skies. They are commonly found near industrial sites or hovering over open roads.
• Time Your Attack:
- If using the Trigger 'Nade: Throw it near the Hornet while it is hovering low or close to a wall, and detonate it manually when the Hornet is within the blast radius.
- If using the Snap Blast: Throw it directly at the Hornet or in its flight path so it explodes on impact.
• Destroy the Hornet:
- You must deliver the final blow using one of these two explosives for it to count.
- It helps to damage the Hornet with your primary weapon first to lower its health, then finish it off with the gadget.
• Extraction: Once the objective is checked off, head to an extraction point to complete the mission.
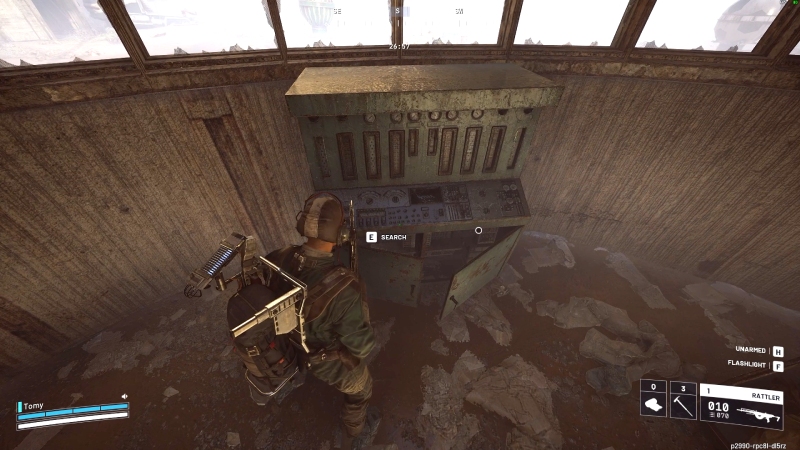
Greasing Her Palms

Objective
• On Dam Battlegrounds, visit the Locked Room in the
Water Treatment Control building
• On Spaceport, scope out the rocket thrusters outside the Rocket Assembly
• On Buried City, visit the barricaded area on floor 6 of the Space Travel Building
• On Dam Battlegrounds, visit the Locked Room in the
Water Treatment Control building
• On Spaceport, scope out the rocket thrusters outside the Rocket Assembly
• On Buried City, visit the barricaded area on floor 6 of the Space Travel Building
Reward
• 1x Lure Grenade Blueprint
• 3x Speaker Component
• 3x Electrical Components
• 1x Lure Grenade Blueprint
• 3x Speaker Component
• 3x Electrical Components
How to Complete
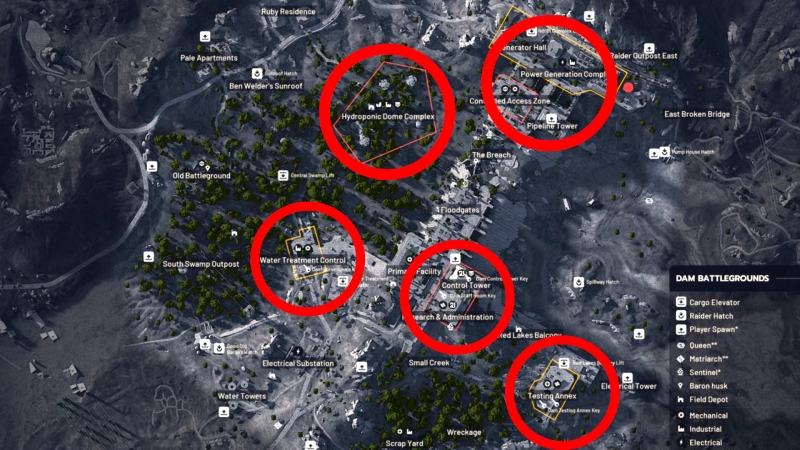
• MAP - Dam Battlegrounds - Water Treatment Control
- Head to the Water Treatment area. You need to find the Control Building and reach the Locked Room.
- Note that you may need a specific keycard or access method (or find a way to peak in) to register the visit.
• MAP - Spaceport – Rocket Assembly:
- Travel to the Rocket Assembly landmark.
- Your goal is to "scope out" the massive rocket thrusters located on the exterior of the building. Getting close to the base of the thrusters usually triggers the objective.
• MAP - Buried City – Space Travel Building:
- Locate the Space Travel Building (a skyscraper) in the urban ruins.
- You must climb up to Floor 6 and find the specific barricaded area.
- Be careful, as these interiors are often cramped and full of ARC machines.
• Successful Extraction:
- This is a multi-map mission. You don't have to do them all in one run, but you must successfully extract after visiting a location for that specific progress to be saved.
Dormant Barons
Objective
• Loot a Baron Husk.
• Loot a Baron Husk.
Reward
• 3x Door Blocker
• 3x Li'l Smoke Grenade
• 3x Door Blocker
• 3x Li'l Smoke Grenade
Map
• Any
• Any
How to Complete
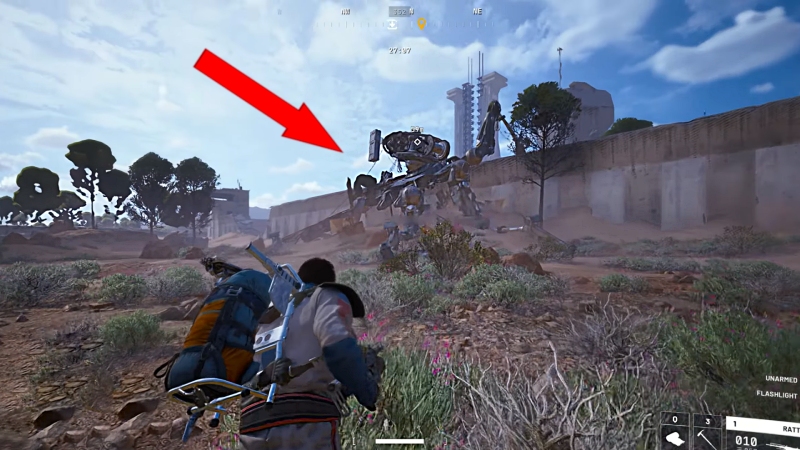
• Locate a Baron Husk: You need to find a Baron, which is a massive, tank-like ARC machine.
- For this mission, you are looking for a "husk", a dormant or destroyed Baron that is already on the map.
• Search Industrial Zones:
- These husks are typically found in large, open combat areas like the Dam Battlegrounds or
near major landmarks in the Buried City.
- Look for a huge, mechanical wreckage that looks like a giant four-legged tank.
• Loot the Core:
- Approach the Baron husk and look for an interaction prompt.
- You will need to loot the internal components (often from the central or rear part of the machine).
• Be Prepared for Combat:
- Even though the Baron you are looting is "dormant," these husks are often
surrounded by active ARC drones or other scavengers.
• Extraction:
- Once you have the loot from the husk, you must successfully extract to deliver the parts and complete the mission.
Mixed Signals
Objective
• Destroy an ARC Surveyor
• Obtain 1 Surveyor Vault.
• Destroy an ARC Surveyor
• Obtain 1 Surveyor Vault.
Reward
• 1x Photoelectric Cloak
• 1x Raider Hatch Key
• 1x Photoelectric Cloak
• 1x Raider Hatch Key
Map
• Any
• Any
How to Complete
• Locate an ARC Surveyor:
- Look for the Surveyor, a medium-sized flying ARC unit. They are often found patrolling high above landmarks or hovering near Field Depots. They are larger than Hornets and usually have a more "industrial" look with visible cargo.
• Destroy the Surveyor:
- Use high-damage weapons to bring it down.
- Be aware that Surveyors have more health than basic drones and may call for reinforcements once attacked.
• Obtain the Surveyor Vault:
- When the Surveyor is destroyed, it will drop a physical container called a Surveyor Vault. You must pick this up and carry it.
• Extraction:
- Since the Vault is a heavy object, it may affect your movement or taking up a specific slot.
- You must successfully extract with the Surveyor Vault in your possession to complete the mission.
What We Left Behind
Objective
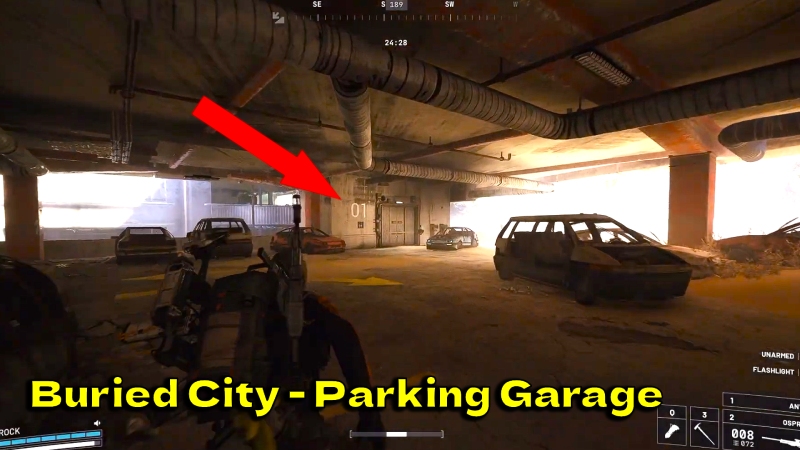
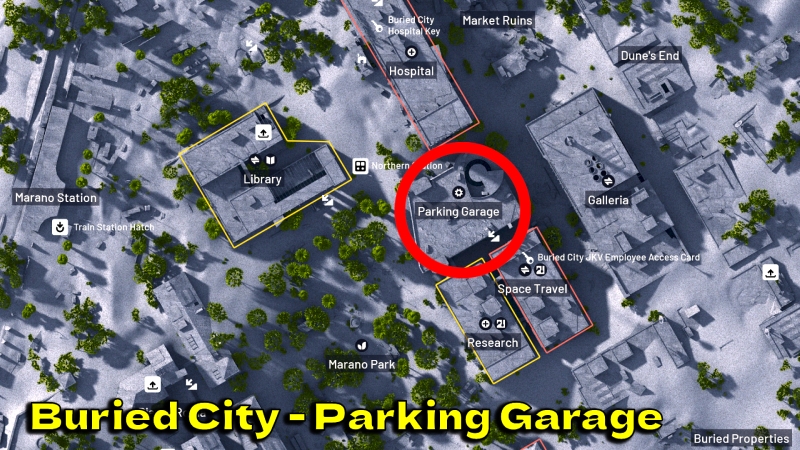
• On Buried City, search 2 containers in the Raider Camp beneath the Parking Garage
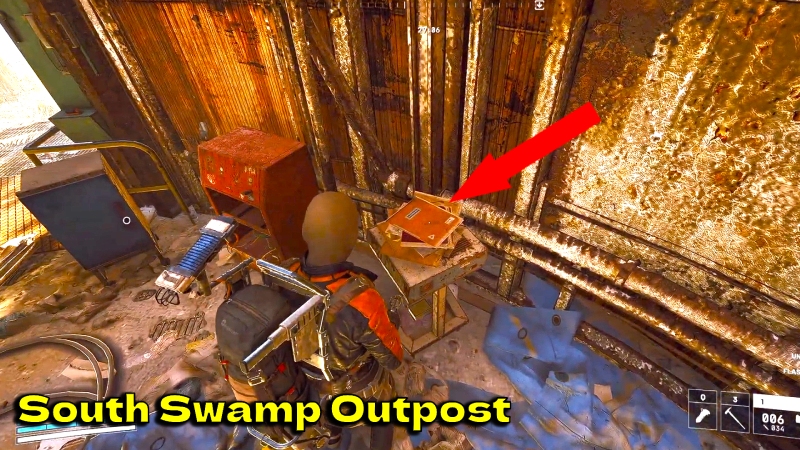
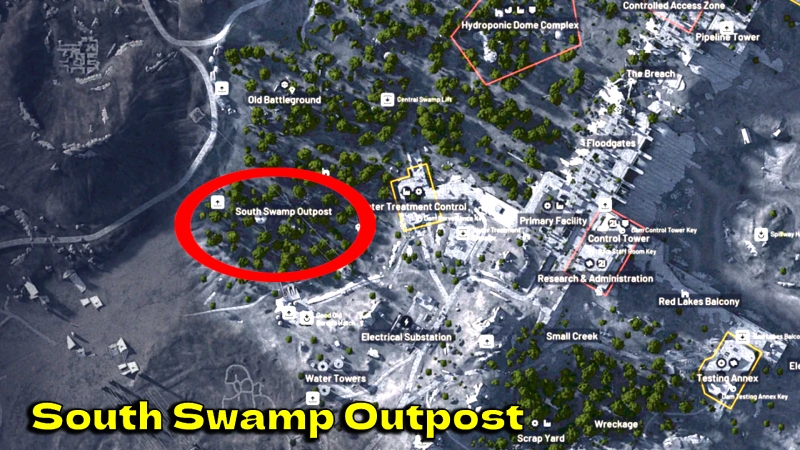
• On Dam Battlegrounds, search for anything significant in the South Swamp Outpost
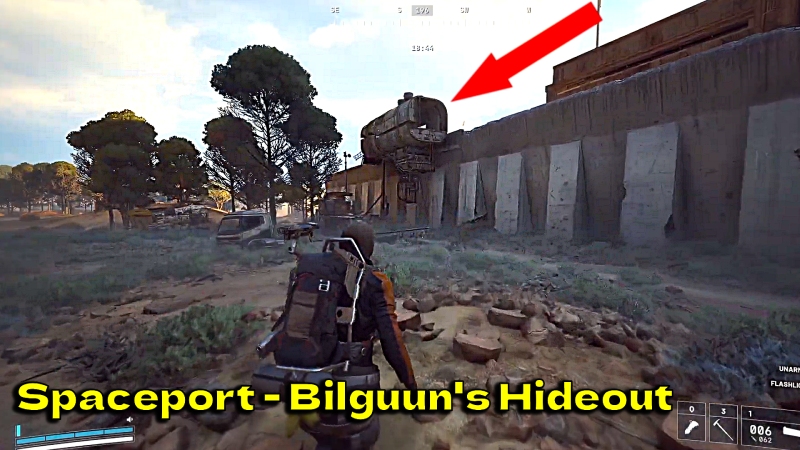
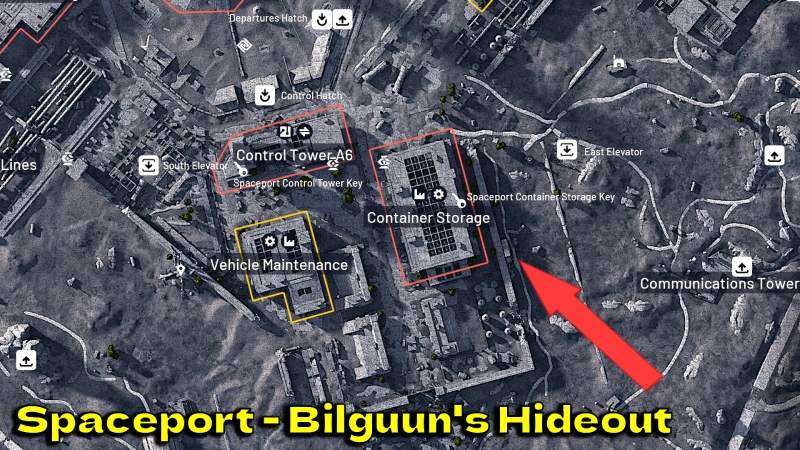
• On Spaceport, search for anything significant in Bilguun's Hideout, next to the Container Storage
• On Buried City, search 2 containers in the Raider Camp beneath the Parking Garage
• On Dam Battlegrounds, search for anything significant in the South Swamp Outpost
• On Spaceport, search for anything significant in Bilguun's Hideout, next to the Container Storage
Reward
• 1x Muzzle Brake II
• 1x Vertical Grip II
• 1x Stable Stock II
• 1x Muzzle Brake II
• 1x Vertical Grip II
• 1x Stable Stock II
How to Complete
• In Buried City - Head to the Parking Garage.
- Go to the lower levels to find the Raider Camp located beneath it.
- You need to find and search 2 containers (look for crates or lockers) inside this camp.
• In Dam Battlegrounds - Travel to the southernmost part of the map to the South Swamp Outpost.
- You need to explore the area until you find a significant item or trigger the "search" prompt,
usually located inside the main shack or near the radio equipment.
• Spaceport - Locate the Container Storage area. Right next to it, find Bilguun's Hideout (a small, tucked-away shelter).
- Search the interior for any specific quest items or notable containers to complete the objective.
• Extraction:
- You must successfully extract after completing the objectives in each map to save your progress.
-
Doctor's Orders
Objective
• Obtain 2 Antiseptic
• Obtain 1 Syringe
• Obtain 1 Durable Cloth
• Obtain 1 Great Mullein
• Obtain 2 Antiseptic
• Obtain 1 Syringe
• Obtain 1 Durable Cloth
• Obtain 1 Great Mullein
Reward
• 3x Adrenaline Shot
• 3xSterilized Bandage
• 1x Surge Shield Recharger
• 3x Adrenaline Shot
• 3xSterilized Bandage
• 1x Surge Shield Recharger
Map
• Any
• Any
How to Complete
• Medical Supplies:
- x2 Antiseptics, x1 Syringeand and x1 Durable Cloth - best to find is in Hospital building on Buried City map.
• Forage for Herbs:
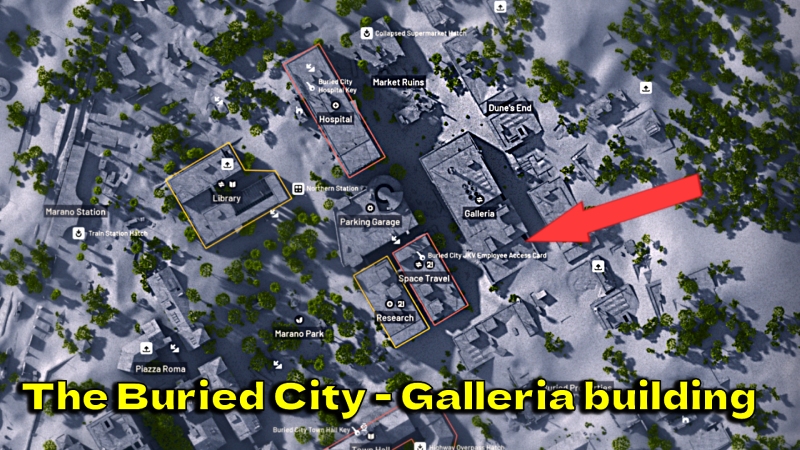
- 1 Great Mullein: The best place to find it is in Galleria building on Buried City map.
• Extraction:
- You must successfully extract with all these items in your inventory to count them toward the mission.
• Medical Supplies:
- x2 Antiseptics, x1 Syringeand and x1 Durable Cloth - best to find is in Hospital building on Buried City map.
• Forage for Herbs:
- 1 Great Mullein: The best place to find it is in Galleria building on Buried City map.
• Extraction:
- You must successfully extract with all these items in your inventory to count them toward the mission.
Medical Merchandise
Objective
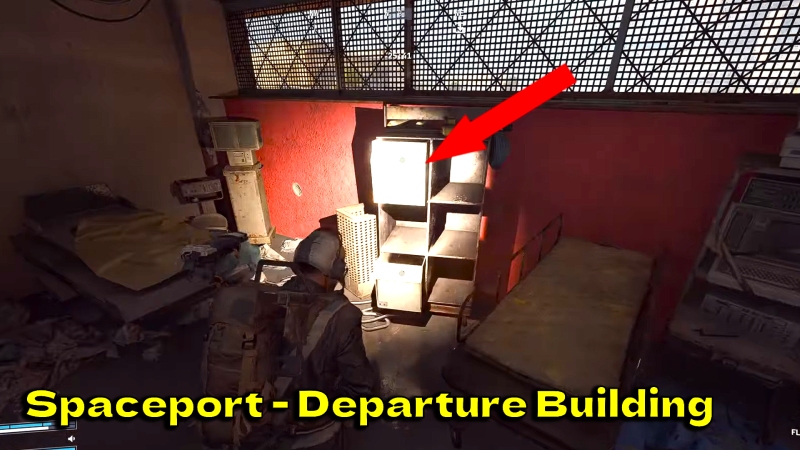
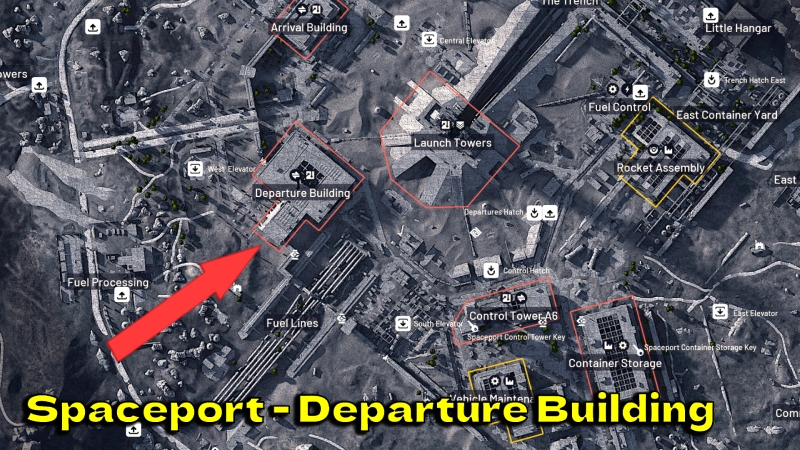
• On Spaceport, search 2 containers in the Departure Building's exam rooms
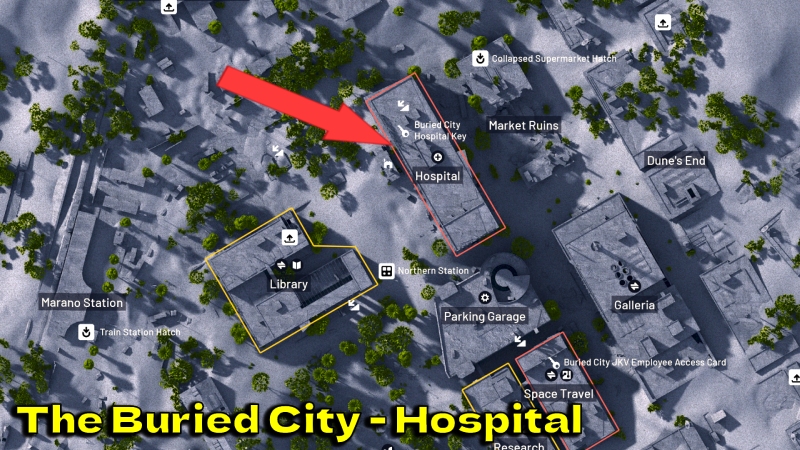
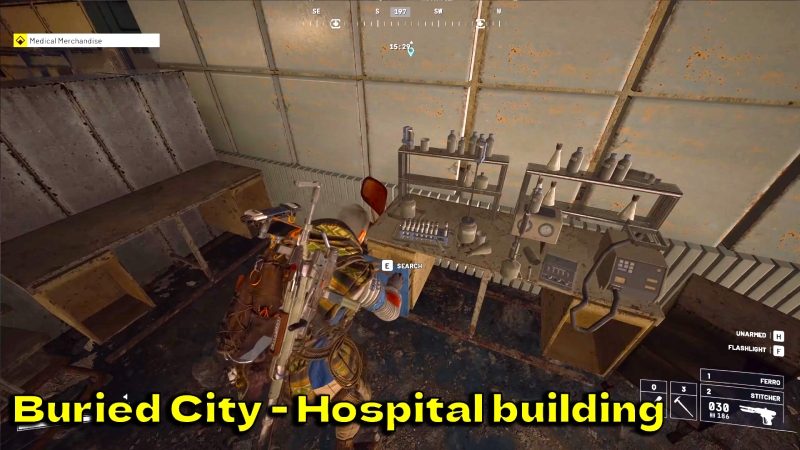
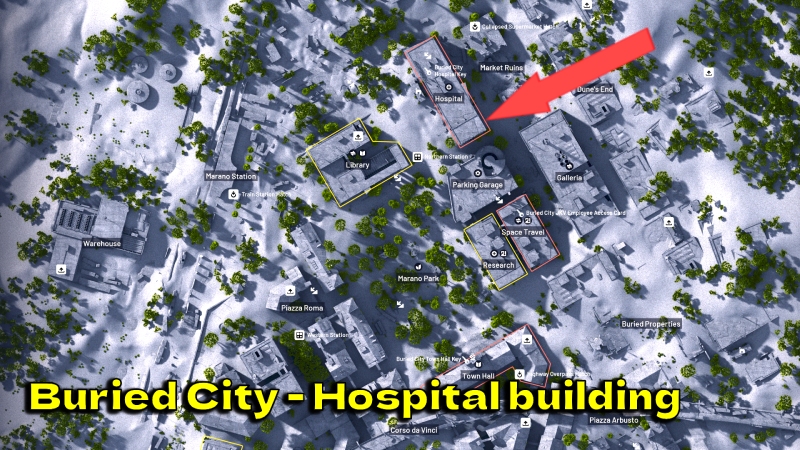
• Search 3 containers in the Hospital in Buried City
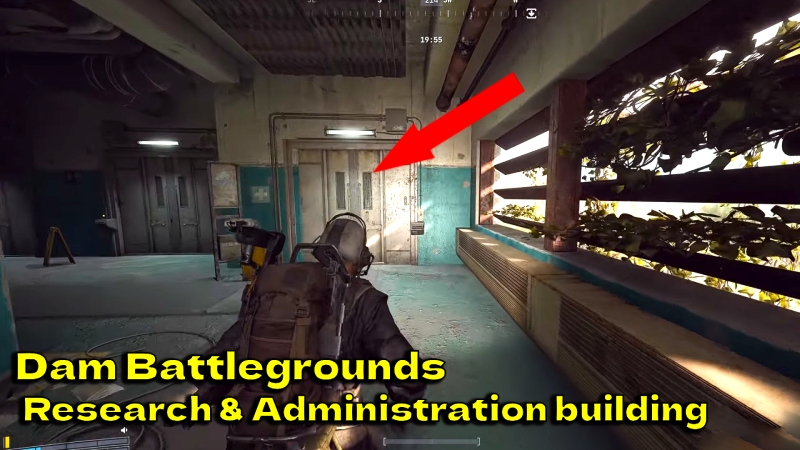
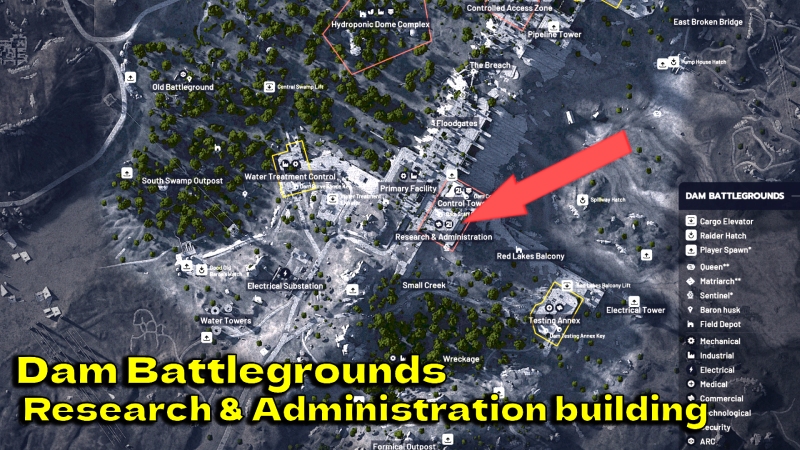
• On Dam Battlegrounds, search 2 containers in the Research & Administration building's medical room
• On Spaceport, search 2 containers in the Departure Building's exam rooms
• Search 3 containers in the Hospital in Buried City
• On Dam Battlegrounds, search 2 containers in the Research & Administration building's medical room
Reward
• 1x Banana Backpack Charm (Cosmetic)
• 3x Defibrillator
• 2x Vita Shot
• 1x Banana Backpack Charm (Cosmetic)
• 3x Defibrillator
• 2x Vita Shot
Map
• Any
• Any
How to Complete
• On Spaceport - Head to the Departure Building and look for the Exam Rooms. These are smaller rooms typically found on the upper or side levels. You must find and search 2 containers (look for medical cabinets or white crates) inside these specific rooms.
• On Buried City - Locate the large Hospital landmark. This area is usually crawling with ARC units.
- Once inside, you need to search 3 containers anywhere within the hospital premises.
• On Dam Battlegrounds - Go to the Research & Administration building.
- Navigate to the Medical Room (often marked with a red cross or medical signs) and search 2 containers inside.
• Extraction:
- After searching the required number of containers in a zone, make sure to successfully extract to save your progress for that map. You can complete these objectives across multiple raids.
A Reveal in Ruins

Objective
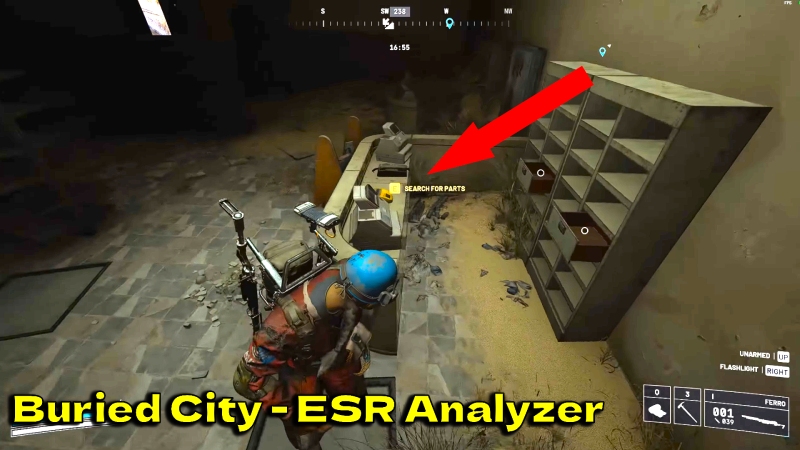
• Search for an ESR Analyzer inside any pharmacy in Buried City
• Deliver the ESR Analyzer to Lance
• Search for an ESR Analyzer inside any pharmacy in Buried City
• Deliver the ESR Analyzer to Lance
Reward
• 1x Tactical Mk. 3 (Healing)
• 1x Surge Shield Recharger
• 1x Tactical Mk. 3 (Healing)
• 1x Surge Shield Recharger
Map
• Buried City
• Buried City
How to Complete
• Locate a Pharmacy:
- Head to the Buried City map and look for buildings marked as Pharmacies
(look for "Pharmacy" signs or green cross symbols on the storefronts)..
• Find the ESR Analyzer:
- Search inside the pharmacy. The ESR Analyzer is a specific quest item, usually found inside a prominent container,
on a counter, or in a back-office area of the shop.
• Carry to Extraction:
- Once you pick up the ESR Analyzer, it is vital that you successfully extract from the map.
- If you are defeated before extracting, you will lose the item and must find it again in a new raid.
Broken Monument

Objective
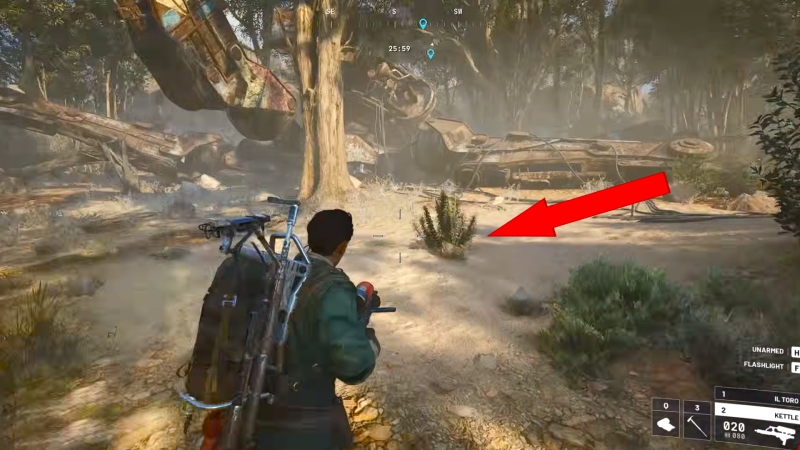
• Reach the hallowed grounds by the Scrap Yard
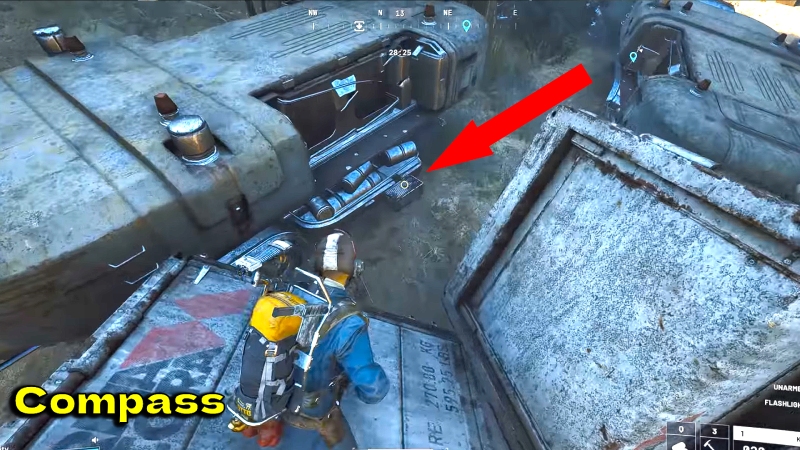
• Search for a compass near the broken-down vehicles
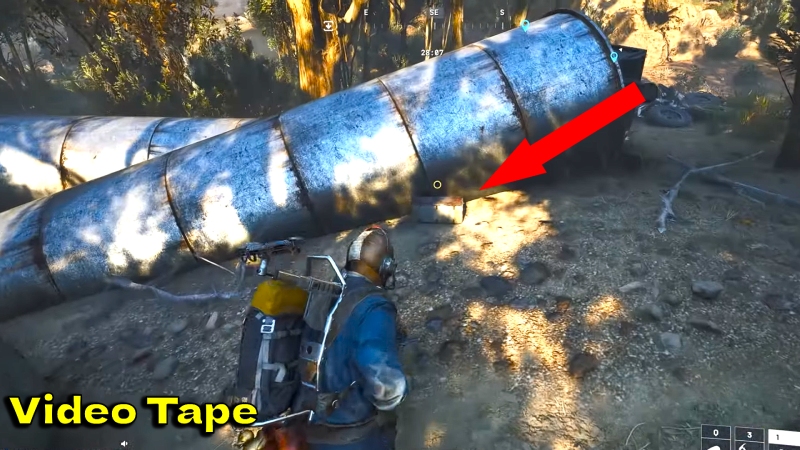
• Search for the video tape near the cylindrical containers
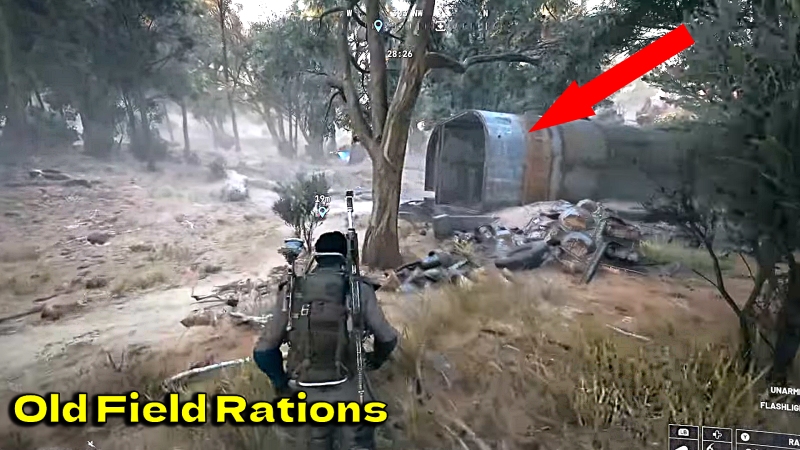
• Search for the old field rations in the Raider camp
• Deliver the First Wave Tape to Tian Wen
• Deliver First Wave Compass to Tian Wen
• Deliver First Wave Rations to Tian Wen
• Reach the hallowed grounds by the Scrap Yard
• Search for a compass near the broken-down vehicles
• Search for the video tape near the cylindrical containers
• Search for the old field rations in the Raider camp
• Deliver the First Wave Tape to Tian Wen
• Deliver First Wave Compass to Tian Wen
• Deliver First Wave Rations to Tian Wen
Reward
• 1x Arpeggio I
• 1x Compensator II
• 80x Medium Ammo
• 1x Arpeggio I
• 1x Compensator II
• 80x Medium Ammo
Map
• Dam Battlegrounds
• Dam Battlegrounds
How to Complete
• Reach the Hallowed Grounds:
- Head to the Scrap Yard on the south end of the Dam Battlegrounds map.
- The objective triggers as you enter the southern portion of this zone.
• Search for the Compass:
- Look for a cluster of broken-down trucks and vehicles in the southern section of the Scrap Yard.
- The First Wave Compass is inside a small yellow-marked box tucked into a triangular gap or alcove between the vehicles.
• Search for the Video Tape:
- Move slightly northeast toward two large cylindrical containers (which look like giant metal pipes half-buried in the dirt).
- The First Wave Video Tape is in a box on the ground next to these containers.
• Search for the Field Rations:
- Continue north/northeast to the Raider Camp. Locate a large, hollowed-out metal shed or trailer.
- The Old Field Rations are inside a small box leaning against the interior wall.
• Extraction:
- After collecting all three items, you must successfully extract.
- Be careful not to unload them into your stash immediately after the raid, as this can sometimes bug the quest progress.
Marked for Death
Objective
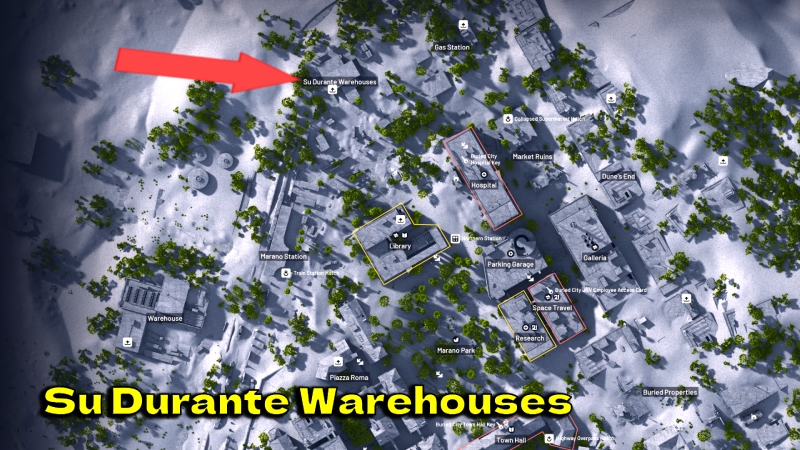
• Reach the Su Durante Warehouses in the Outskirts in Buried City
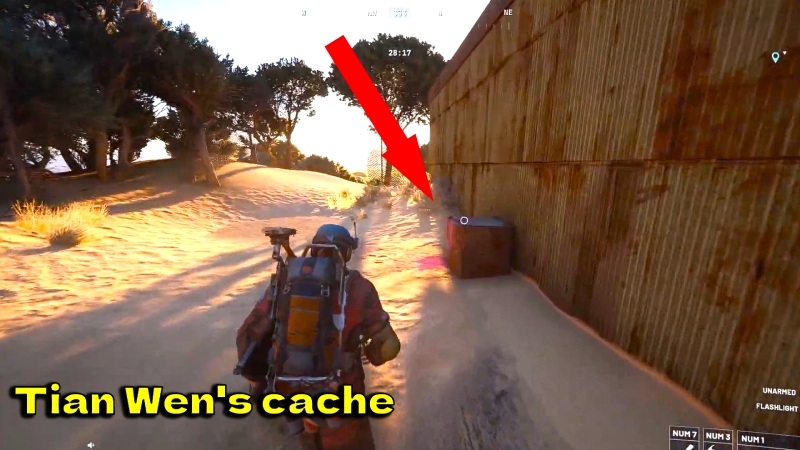
• Search for Tian Wen's cache near the Warehouses.
• Follow the clues.
• Reach the Su Durante Warehouses in the Outskirts in Buried City
• Search for Tian Wen's cache near the Warehouses.
• Follow the clues.
Reward
• 1x Shotgun Choke II
• 1x Angled Grip II
• 1x Shotgun Choke II
• 1x Angled Grip II
Map
• Buried City
• Buried City
How to Complete
• Locate the Outskirts:
- Travel to the Buried City map and head toward the area known as the Outskirts.
• Reach the Su Durante Warehouses:
- Navigate to the Su Durante Warehouses landmark.
- This is a cluster of large industrial buildings often surrounded by high fences and loading docks.
• Trigger the Objective:
- You simply need to enter the perimeter of the warehouse complex.
- Once you reach the specific zone, the mission objective will update as "completed."
• Be Prepared:
- This area is a known hotspot for ARC Crawlers and snipers, so approach with caution or use the nearby ruins for cover.
• Extraction:
- While the goal is just to reach the location, you must successfully extract to ensure your progress
is logged and to move on to the next part of the questline.
Straight Record
Objective
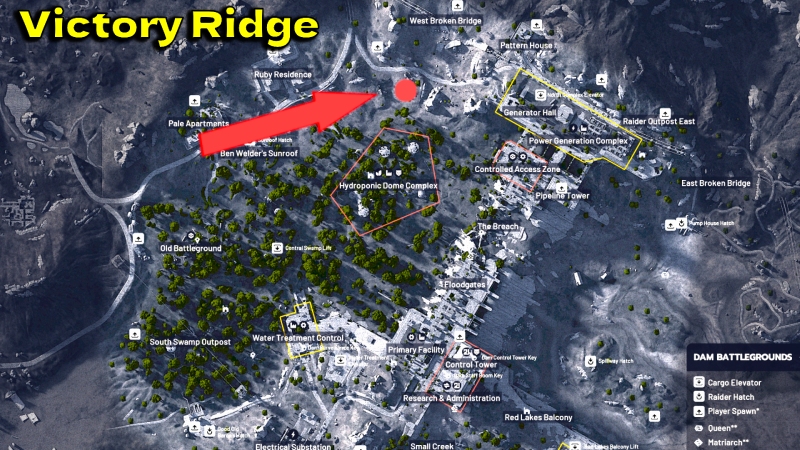
• Reach Victory Ridge
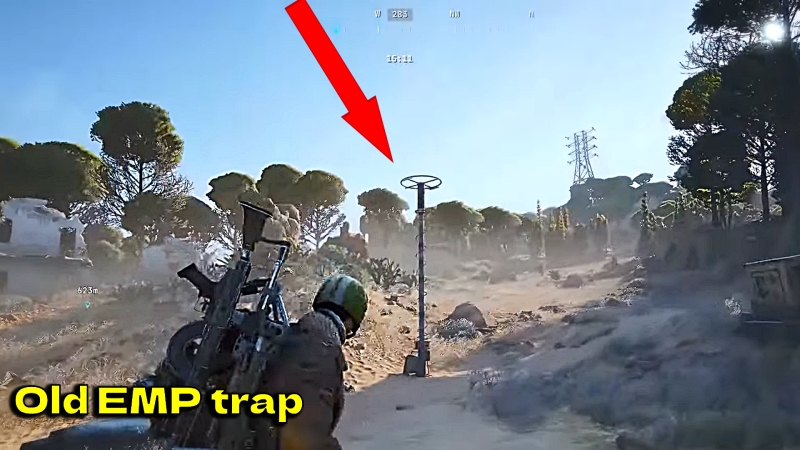
• Find the old EMP trap
• Disable the first power switch
• Disable the second power switch
• Disable the third power switch
• Shutdown the EMP trap
• Reach Victory Ridge
• Find the old EMP trap
• Disable the first power switch
• Disable the second power switch
• Disable the third power switch
• Shutdown the EMP trap
Reward
• 5x Medium Gun Parts
• 3x Advanced Mechanical Components
• 5x Medium Gun Parts
• 3x Advanced Mechanical Components
Map
• Dam Battlegrounds
• Dam Battlegrounds
How to Complete
• Reach Victory Ridge:
- Head to the Victory Ridge landmark on the map. This is a high-ground, fortified area often heavily guarded by ARC units.
• Find the Old EMP Trap:
- Once at the ridge, locate the EMP Trap installation.
- It is a large mechanical structure emitting electrical pulses or a blue glow.
• Disable Three Power Switches:
- You must find and interact with three power switches located in the immediate area surrounding the trap.
- Follow the glowing yellow cables on the ground; they lead directly from the main trap to each of the three switches.
• Shutdown the EMP Trap:
- After all three switches are flipped, return to the main console at the center of the EMP trap and interact
with it to shut the system down completely.
• Extraction:
- Once the trap is disabled, head to the nearest extraction point to secure your mission progress.
A Lay of the Land
Objective
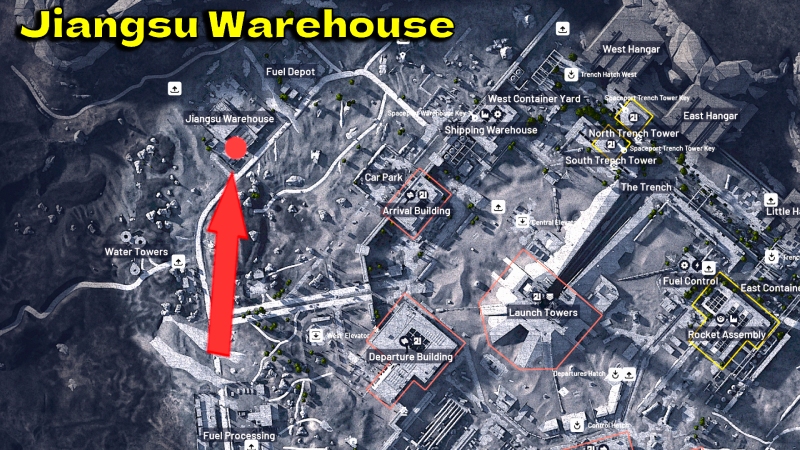
• Reach the Jiangsu Warehouse
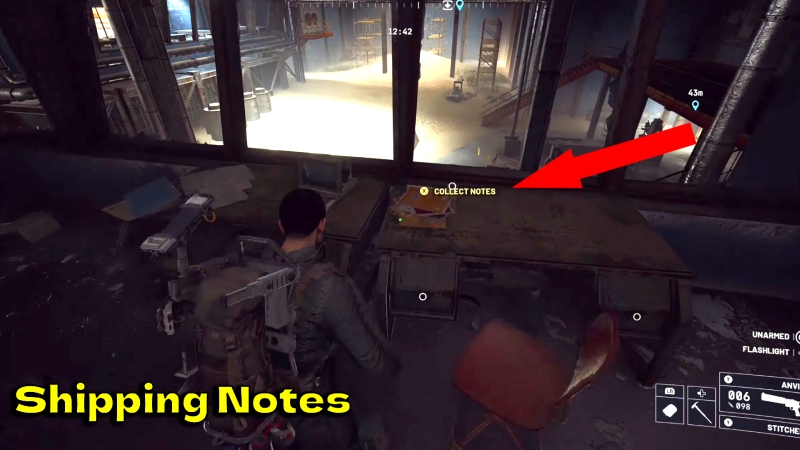
• Find the shipping notes in the foreman's office
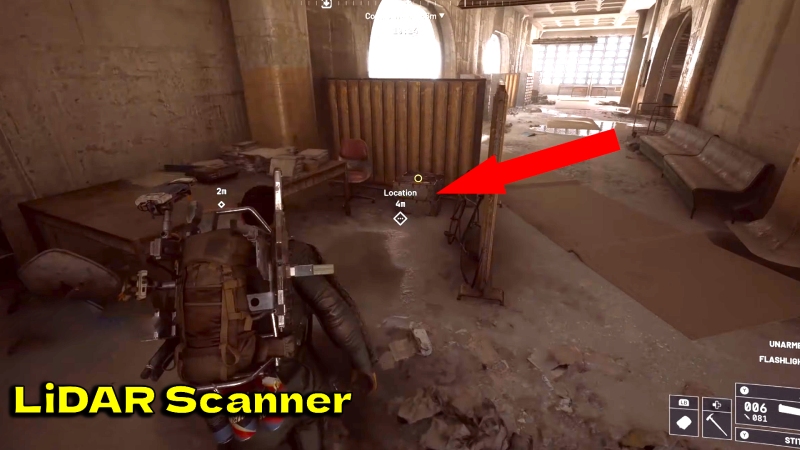
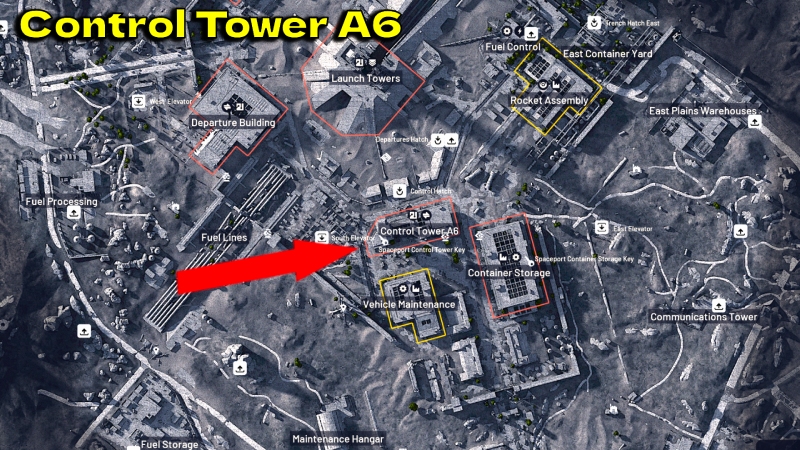
• Locate the scanners on the upper floor of Control Tower A6
• Deliver 1 LiDAR Scanners to Shani
• Reach the Jiangsu Warehouse
• Find the shipping notes in the foreman's office
• Locate the scanners on the upper floor of Control Tower A6
• Deliver 1 LiDAR Scanners to Shani
Reward
• 1x Dam Testing Annex Key
• 3x Zipline
• 2x Smoke Grenade
• 1x Dam Testing Annex Key
• 3x Zipline
• 2x Smoke Grenade
Map
• Spaceport
• Spaceport
How to Complete
• Reach the Jiangsu Warehouse:
- Head to the Jiangsu Warehouse landmark. It is a large industrial building, usually heavily guarded by ARC units.
• Find Shipping Notes:
- Locate the foreman’s office inside the warehouse. It is typically a small, raised room or glass-walled office overlooking the main floor. Interact with the desk or filing cabinet to find the Shipping Notes.
• Locate the Scanners:
- Move to Control Tower A6. Go to the upper floor of the tower to find the equipment.
• Obtain 1 LiDAR Scanner:
- Interact with the technical crates or consoles on the top floor of the tower to pick up the LiDAR Scanner.
• Extraction:
- You must successfully extract with the LiDAR Scanner in your inventory.
- If you are defeated, you will lose the item and have to retrieve it again.
Market Correction
Objective
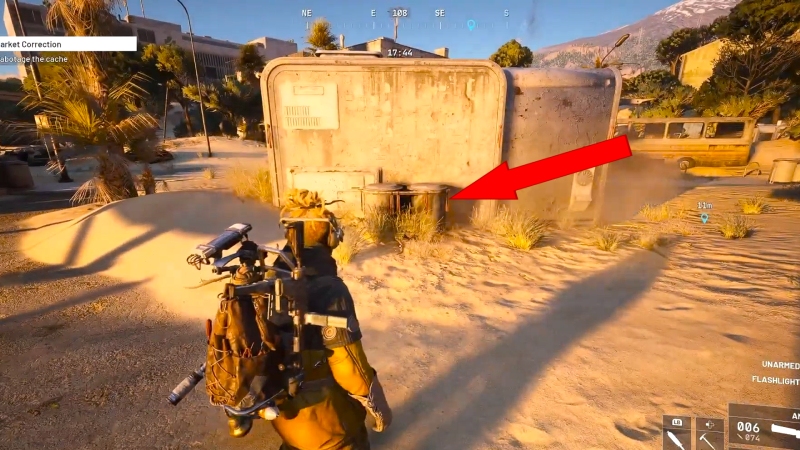
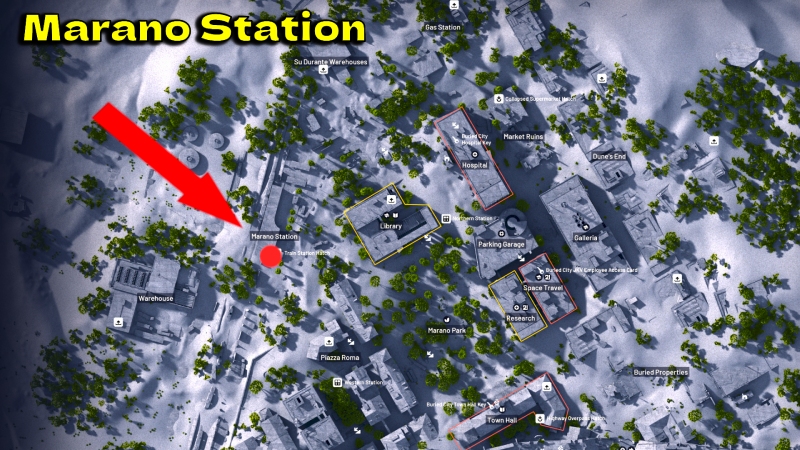
• Locate the cache near Marano Station.
• Sabotage the cache.
• Locate the cache near Marano Station.
• Sabotage the cache.
Reward
• 1x Silencer II
• 1x Extended Light Mag I
• 1x Compensator I
• 1x Silencer II
• 1x Extended Light Mag I
• 1x Compensator I
Map
• Buried City
• Buried City
How to Complete
• Locate the Cache:
- Head to the area around Marano Station (on the Buried City map).
- Look for a hidden stash of crates, usually tucked away in a corner, behind some debris, or inside a small side room near the station's main tracks or platform.
• Sabotage the Cache:
- Once you find the cache, you need to interact with it to plant a charge or sabotage the contents.
- This process takes a few seconds, during which you are vulnerable.
• Defend the Position:
- Sabotaging the cache may alert nearby ARC units or Raiders. Be prepared for a brief skirmish as the alarms go off.
• Extraction:
- After the sabotage is complete, the objective will update.
- Proceed to the nearest extraction point to successfully finish the mission.
Keeping the Memory
Objective
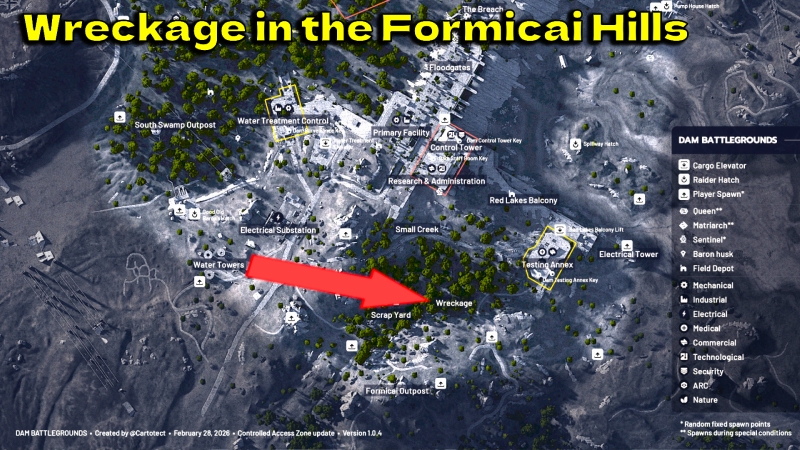
• Reach the wreckage in the Formicai Hills.
• Search for the missing helmet.
• Return the helmet to the memorial.
• Reach the wreckage in the Formicai Hills.
• Search for the missing helmet.
• Return the helmet to the memorial.
Reward
• 5x Simple Gun Parts
• 5x Duct Tape
• 5x Magnet
• 5x Simple Gun Parts
• 5x Duct Tape
• 5x Magnet
Map
• Dam Battlegrounds
• Dam Battlegrounds
How to Complete
• Reach the Formicai Hills:
- Head to the Formicai Hills region. Look for a specific wreckage site, which is usually marked by twisted metal and debris from a past battle.
• Search for the Missing Helmet:
- Scout the immediate area around the wreckage. The missing helmet is a unique quest item typically hidden among the scrap or partially buried in the dirt.
- Use your scanner to highlight it if you have trouble spotting it.
• Return to the Memorial:
- Once you have the helmet, look for the memorial site nearby (usually marked by a grave, a plaque, or a small monument).
- Interact with the memorial to place the helmet back where it belongs.
• Extraction:
- After the helmet is returned, your objective is complete. Extract successfully to secure your rewards and mission progress.
Reduced to Rubble
Objective
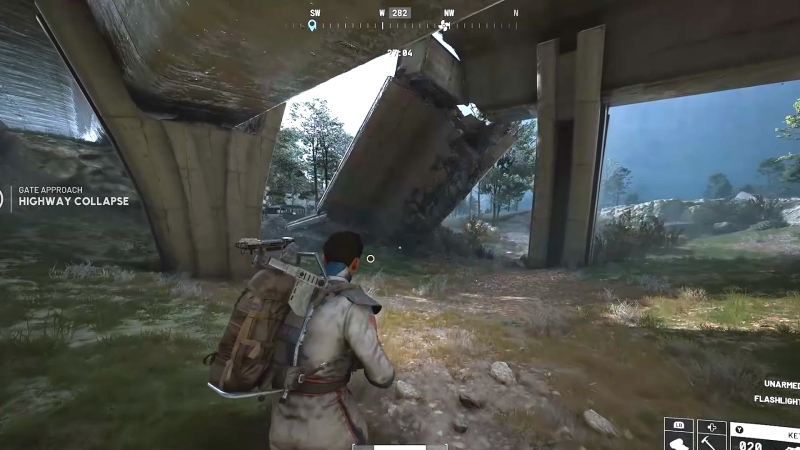
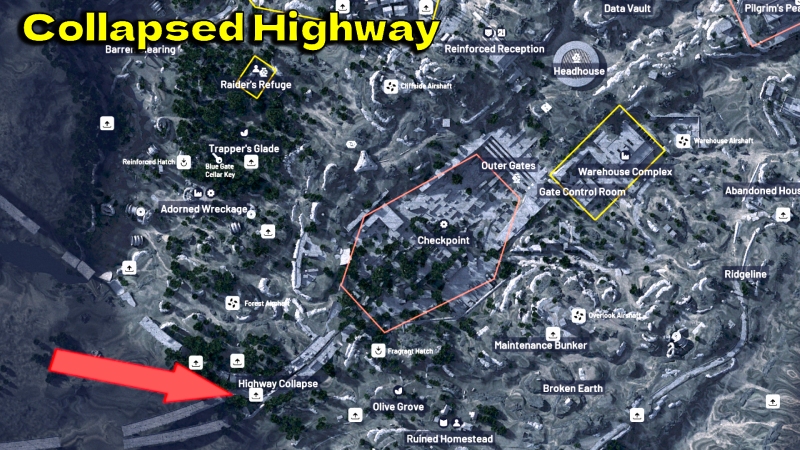
• Take a photo of the Collapsed Highway
• Go to the Broken Earth
• Follow the trail of destruction through the Broken Earth
• Investigate the unknown ARC machines
• Take a photo of the Collapsed Highway
• Go to the Broken Earth
• Follow the trail of destruction through the Broken Earth
• Investigate the unknown ARC machines
Reward
• 1x Zipline
• 3x Barricade Kit
• 3x Doorblockers
• 1x Zipline
• 3x Barricade Kit
• 3x Doorblockers
Map
• The Blue Gate
• The Blue Gate
How to Complete
• Take a Photo of the Collapsed Highway:
- Head to the Collapsed Highway landmark.
- You need to use your in-game camera (photo mode) to take a picture of the destroyed structure. Ensure the highway is clearly in frame for the objective to trigger.
• Go to the Broken Earth:
- Move toward the region known as Broken Earth. This area is characterized by massive fissures and upturned ground.
• Follow the Trail of Destruction:
- Once you are in the Broken Earth, look for signs of recent movement - crushed structures, debris, and large tracks.
- Follow this "trail" as it leads you deeper into the zone.
• Investigate the Unknown ARC Machines:
- At the end of the trail, you will find a group of unique or high-tier ARC machines.
- You don't necessarily have to destroy them all, but you must get close enough to "scan" or "investigate" them to complete the intel gathering.
• Extraction:
- After the investigation is complete, extract successfully to bring the photos and intel back to base.
With A Trace

Objective
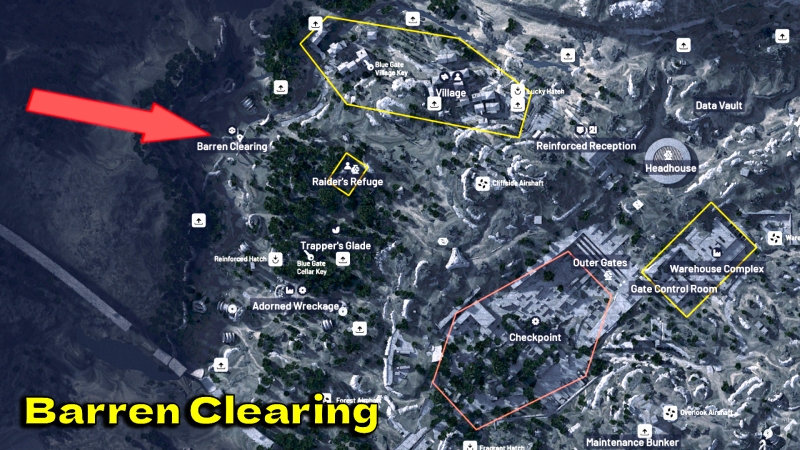
• Reach the Barren Clearing.
• Find signs of who brought down the ARC machines.
• Inspect the Adorned Wreckage.
• Inspect the communications device.
• Reach the Barren Clearing.
• Find signs of who brought down the ARC machines.
• Inspect the Adorned Wreckage.
• Inspect the communications device.
Reward
• 1x Looting Mk. 2
• 1x Medium Shield
• 1x Looting Mk. 2
• 1x Medium Shield
Map
• The Blue Gate
• The Blue Gate
How to Complete
• Reach the Barren Clearing:
- Head to the location marked as the Barren Clearing. This is usually an open, desolate area with very little cover.
• Find Signs of Combat:
- Search the clearing for clues about the battle.
- You are looking for evidence (like specific shell casings or non-ARC markings)
that shows who or what actually destroyed the machines.
• Inspect the Adorned Wreckage:
- Locate a specific piece of ARC wreckage that has been "adorned" or decorated (often with trophies or strange markings).
- Interact with it to gather intel.
• Inspect the Communications Device:
- Find the communications device near the wreckage site.
- Interacting with this device will likely play a log or trigger the final part of the investigation.
• Extraction:
- Once you have inspected all the points of interest, head to an extraction point to bring the information back to Speranza.
Eyes on the Prize
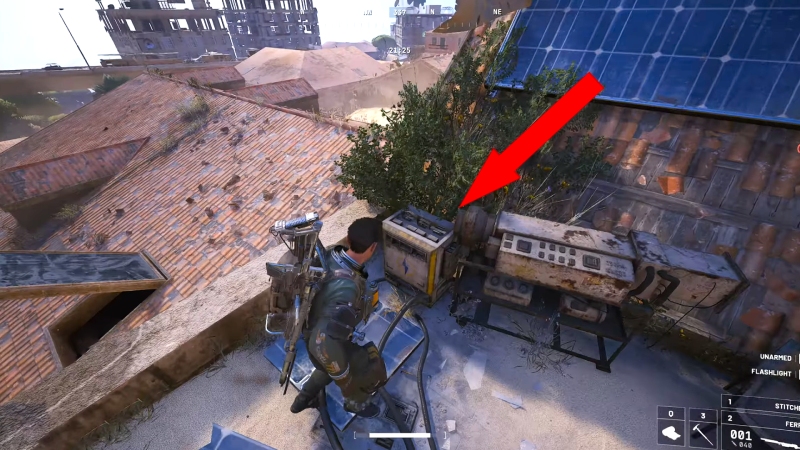
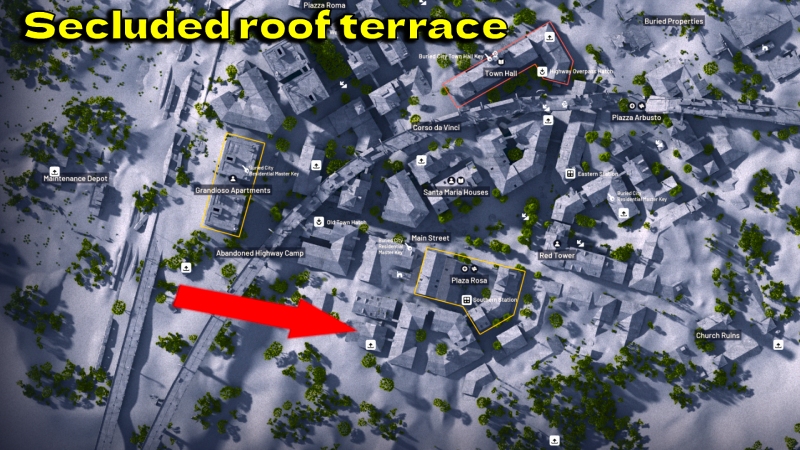
Objective
• Find the secluded roof terrace south-west of the Southern Station,
look for blue tarps
• Rewire the solar panel using 3 Wires
• Find the secluded roof terrace south-west of the Southern Station,
look for blue tarps
• Rewire the solar panel using 3 Wires
Reward
• 1x Extended Shotgun Mag II
• 1x Extended Medium Mag II
• 1x Extended Shotgun Mag II
• 1x Extended Medium Mag II
Map
• Buried City
• Buried City
How to Complete
• Locate the Secluded Roof Terrace:
- Head to the area south-west of the Southern Station.
- Look for a building with bright blue tarps draped over the roof or railings—this is your landmark.
• Climb to the Roof:
- Find a ladder or use the surrounding structures to reach the terrace.
• Rewire the Solar Panel:
- Once on the roof, locate the solar panel setup. You will need 3 Wires in your inventory to complete the repair.
• Interact to Repair:
- Approach the panel and use the "Repair" or "Interact" prompt to consume the wires and fix the connection.
• Extraction:
- After the panel is rewired, the objective is complete. Extract successfully to secure your rewards.
Echoes of Victory Ridge
Objective
• Reach Victory Ridge
• Retrieve the battle plans from the hideout under the broken highway
• Deliver Major Aiva's Patch to Celeste
• Reach Victory Ridge
• Retrieve the battle plans from the hideout under the broken highway
• Deliver Major Aiva's Patch to Celeste
Reward
• 6x Crude Explosives
• 2x Processor
• 1x Music Box
• 6x Crude Explosives
• 2x Processor
• 1x Music Box
Map
• Dam Battlegrounds
• Dam Battlegrounds
How to Complete
• Reach Victory Ridge:
- Head to the Victory Ridge landmark.
- This is a high-altitude fortified area, so be prepared for vertical combat against ARC drones.
• Locate the Hideout:
- Look for a broken section of the highway near the ridge.
- Underneath the collapsed concrete structures, there is a small, hidden shelter or "hideout."
• Retrieve the Battle Plans:
- Inside the hideout, search for a desk or a tactical map case to find the Battle Plans.
• Deliver the Patch:
- You should already have Major Aiva's Patch (or you will find it within the same hideout).
- Once you have both the plans and the patch, extract successfully.
• Return to Celeste: Go to the vendor Celeste in Speranza to deliver the patch and complete the mission.
Industrial Espionage
Objective
• Find Tian Wen's weapon cache near the Gas Station in the Outskirts
• Deliver the Burletta to the rival weapon cache
• Find Tian Wen's weapon cache near the Gas Station in the Outskirts
• Deliver the Burletta to the rival weapon cache
Reward
• 3x Mechanical Components
• 3x Simple Gun Parts
• 3x Mechanical Components
• 3x Simple Gun Parts
Map
• Buried City
• Buried City
How to Complete
• Locate the Gas Station:
- Head to the Outskirts area in the Buried City.
- Find the Gas Station landmark, which is a frequent spot for raider activity.
• Find Tian Wen’s Cache:
- Search the immediate area around the Gas Station (check the garage or small sheds nearby).
- You are looking for a specific hidden crate containing a weapon called the Burletta.
• Transport the Burletta:
- Once you pick up the Burletta, you must carry it to a rival weapon cache.
- The location for this rival cache will be marked on your HUD, usually in a different part of the
Outskirts or a nearby industrial building.
• Plant the Weapon:
- Interact with the rival cache to "deliver" or plant the Burletta inside.
- This completes the sabotage/trade part of the mission.
• Extraction:
- After the delivery is confirmed, head to an extraction point to successfully finish the mission.
Unexpected Initiative
Objective
• Reach the Grandioso Apartments in Buried City
• Search for Fertilizer on the rooftop of the Grandioso Apartments
• Reach Piazza Roma in Buried City
• Search for a Water Pump in the broken rooftop gardens at Piazza Roma
• Deliver a Water Pump to Tian Wen
• Deliver Fertilizer to Tian Wen
• Reach the Grandioso Apartments in Buried City
• Search for Fertilizer on the rooftop of the Grandioso Apartments
• Reach Piazza Roma in Buried City
• Search for a Water Pump in the broken rooftop gardens at Piazza Roma
• Deliver a Water Pump to Tian Wen
• Deliver Fertilizer to Tian Wen
Reward
• 1x IL Toro I
• 1x Shotgun Choke II
• 1x IL Toro I
• 1x Shotgun Choke II
Map
• Buried City
• Buried City
How to Complete
• Reach Grandioso Apartments:
- Head to the Grandioso Apartments landmark in the Buried City.
- This is a tall residential building that requires some climbing.
• Search for Fertilizer:
- Make your way to the rooftop.
- Look for gardening supplies or white bags labeled as Fertilizer.
• Reach Piazza Roma:
- Travel to the Piazza Roma area (also in Buried City).
- This is an open square surrounded by historic-looking buildings.
• Search for a Water Pump:
- Look for the broken rooftop gardens overlooking the Piazza.
- You will need to climb up to find the Water Pump among the irrigation equipment or debris.
• Extraction:
- You must successfully extract with both the Fertilizer and the Water Pump in your inventory. You can collect them in separate raids if necessary.
A Symbol of Unification
Objective
• Reach the Formicai Outpost in Dam Battlegrounds
• Locate the flag at the Formicai Outpost
• Hoist the flag on the small platform overlooking the red lake
• Reach the Formicai Outpost in Dam Battlegrounds
• Locate the flag at the Formicai Outpost
• Hoist the flag on the small platform overlooking the red lake
Reward
• 3x Mod Components
• 5x Duct Tape
• 3x Mod Components
• 5x Duct Tape
Map
• Dam Battlegrounds
• Dam Battlegrounds
How to Complete
• Reach the Formicai Outpost:
- Head to the Formicai Outpost located in the Dam Battlegrounds.
- This is a fortified position, so expect resistance from ARC units guarding the perimeter.
• Locate the Flag:
- Once inside the outpost, search for the folded flag.
- It is usually found on a crate or a table within one of the main structures or near the center of the camp.
• Find the Overlook Platform:
- Look for a small wooden or metal platform that provides a clear view of the Red Lake
(the large body of rusted/red water nearby).
• Hoist the Flag:
- Approach the flagpole on that platform and interact with it to "Hoist the flag."
- You will have to stand still for a few seconds while the animation completes.
• Extraction:
- After the flag is raised, head to the nearest extraction point to finalize the mission.
Celeste's Journals
Objective
• Retrieve Celeste's Journals from the South Swamp Outpost
• Retrieve Celeste's Journals from the northern outpost overlooking the Red Lakes
• Deliver 2 Journals to Celeste
• Retrieve Celeste's Journals from the South Swamp Outpost
• Retrieve Celeste's Journals from the northern outpost overlooking the Red Lakes
• Deliver 2 Journals to Celeste
Reward
• 1x Magnetic Accelerator
• 3x Heavy Gun Parts
• 1x Exodus Modules
• 1x Magnetic Accelerator
• 3x Heavy Gun Parts
• 1x Exodus Modules
Map
• Dam Battlegrounds
• Dam Battlegrounds
How to Complete
• Visit the South Swamp Outpost:
- Head to the far south of the Dam Battlegrounds.
- Search the buildings at the South Swamp Outpost to find the first journal.
- It is typically found on a desk or a shelf inside one of the shacks.
• Visit the Northern Outpost:
- Travel to the northern part of the map to the outpost that sits on the cliffs overlooking the Red Lakes.
• Retrieve the Second Journal:
- Search the interior of the northern outpost’s main structure to locate the second volume of Celeste's Journals.
• Extraction:
- You must successfully extract with both journals in your inventory.
- You can collect them in separate raids, but they must be in your possession when you leave the map to count.
Back on Top
Objective
• On Dam Battlegrounds, mark the Pattern House
• On The Blue Gate, mark the white lookout tower south of the Warehouse Complex
• On Spaceport, mark the South Trench Tower
• On Buried City, mark the building with the mural in the Buried Properties
• On Dam Battlegrounds, mark the Pattern House
• On The Blue Gate, mark the white lookout tower south of the Warehouse Complex
• On Spaceport, mark the South Trench Tower
• On Buried City, mark the building with the mural in the Buried Properties
Reward
• 1x Renegade I
• 1x Stable Stock III
• 80x Medium Ammo
• 1x Renegade I
• 1x Stable Stock III
• 80x Medium Ammo
Map
• Any
• Any
How to Complete
• On Dam Battlegrounds - Locate the Pattern House (a distinct building with geometric designs).
- You "mark" it by reaching the roof or interacting with a specific spot at the location.
• On The Blue Gate - Head south of the Warehouse Complex. Look for a prominent white lookout tower. Reach the top level to trigger the mark.
• Spaceport - Find the South Trench Tower near the industrial trenches.
- You need to reach the upper platform of this tower.
• Buried City - Travel to the Buried Properties district. Look for a building decorated with a large,
colorful mural. Climb to the roof to finish the scouting.
• Extraction:
- While you can complete these in separate raids, you must successfully extract after visiting
a location for that specific progress to be saved.
The Major's Footlocker
Objective
• Search for Major Aiva's mementos in the apartments northwest of The Dam
• Deliver Major Aiva's Mementos to Tian Wen
• Search for Major Aiva's mementos in the apartments northwest of The Dam
• Deliver Major Aiva's Mementos to Tian Wen
Reward
• 1x Hullcracker Blueprint
• 1x Hullcracker Blueprint
Map
• Dam Battlegrounds
• Dam Battlegrounds
How to Complete
• Locate the Apartments:
- Head to the Dam Battlegrounds map.
- Move to the residential area located northwest of The Dam structure itself.
• Search for the Mementos:
- Enter the apartment buildings and search the rooms.
- You are looking for a specific container (the footlocker) or loose items labeled as Major Aiva's Mementos.
- They are usually found in a bedroom or a small storage closet.
• Secure the Items:
- Once you pick up the mementos, they will occupy space in your inventory.
- You must successfully extract from the map to keep them.
Out of the Shadows
Objective
• Destroy a Rocketeer
• Obtain a Rocketeer Driver
• Destroy a Rocketeer
• Obtain a Rocketeer Driver
Reward
• 3x Surge Shield Recharger
• 2x Wolfpack
• 3x Surge Shield Recharger
• 2x Wolfpack
Map
• Any
• Any
How to Complete
• Locate a Rocketeer:
- Look for a Rocketeer, which is a ground-based ARC unit equipped with rocket launchers.
- They are typically found guarding Field Depots or patrolling near high-value industrial landmarks.
• Destroy the Rocketeer:
- Engage the unit from a distance if possible.
- The Rocketeer deals high explosive damage, so use cover and aim for its glowing
weak spots or the rocket pods on its back.
• Obtain the Rocketeer Driver:
- Once the Rocketeer is destroyed, it will drop a component called the Rocketeer Driver.
- You must pick this up from the wreckage.
• Extraction:
- You must successfully extract with the Rocketeer Driver in your inventory to complete the objective.
Eyes in the Sky
Objective
• On Dam Battlegrounds, install a LiDAR Scanner at the top of the Control Tower
• On Spaceport, install a LiDAR Scanner at the Communications Tower
• On Buried City, install a LiDAR Scanner on top of the Galleria sign
• On Dam Battlegrounds, install a LiDAR Scanner at the top of the Control Tower
• On Spaceport, install a LiDAR Scanner at the Communications Tower
• On Buried City, install a LiDAR Scanner on top of the Galleria sign
Reward
• 1x Vita Spray
• 5x Yellow Light Stick
• 1x Vita Spray
• 5x Yellow Light Stick
Map
• Any
• Any
How to Complete
• Dam Battlegrounds - Head to the Control Tower (near the Dam).
- Climb to the very top platform and look for the interaction prompt to install the LiDAR Scanner.
• Spaceport - Locate the tall Communications Tower.
- You will need to use ladders or stairs to reach the highest reachable level to place the second scanner.
• Buried City - Find the Galleria building in the city ruins.
- You need to parkour or climb up until you are standing directly on top of the large Galleria sign to install the final scanner.
• Extraction:
- You must successfully extract after each installation to save your progress. You can complete these in separate runs.
Our Presence Up There
Objective
• Visit the Pattern House in The Dam
• Find and interact with the Power Switch
• Complete the antenna installation on the roof
• Visit the Pattern House in The Dam
• Find and interact with the Power Switch
• Complete the antenna installation on the roof
Reward
• 1x Buried City Town Hall Key
• 1x Raider Hatch Key
• 1x Jolt Mine
• 1x Buried City Town Hall Key
• 1x Raider Hatch Key
• 1x Jolt Mine
Map
• Dam Battlegrounds
• Dam Battlegrounds
How to Complete
• Visit the Pattern House:
- Head to the Pattern House in The Dam region.
- This is the distinct building decorated with geometric patterns on its exterior.
• Find the Power Switch:
- Once inside or near the building, locate the Power Switch.
- You may need to follow yellow power cables on the walls or floor to find the breaker box.
- Interact with it to restore power to the building's systems.
• Install the Antenna:
- Head to the roof of the Pattern House. Look for the designated mount for the antenna.
- Interact with it to complete the installation.
• Extraction:
- After the antenna is secured, head to an extraction point to save your progress.
Communication Hideout
Objective
• Reach the Red Tower in Old Town
• Find missing battery cell
• Install the battery cell in the Generator
• Enable the power on the Generator
• Boot the antenna terminal near the Red Tower
• Reach the Red Tower in Old Town
• Find missing battery cell
• Install the battery cell in the Generator
• Enable the power on the Generator
• Boot the antenna terminal near the Red Tower
Reward
• 1x Anvil III
• 40x Heavy Ammo
• 1x Anvil III
• 40x Heavy Ammo
Map
• Buried City
• Buried City
How to Complete
• Reach the Red Tower:
- Head to the Old Town district in the Buried City and locate the Red Tower, a prominent tall structure.
• Find the Battery Cell:
- Search the immediate area around the tower.
- The Missing Battery Cell is a physical quest item often hidden in nearby garages, basements, or small utility sheds.
• Restore Power:
- Carry the battery cell to the Generator located at the base of the tower.
- Interact with the generator to install the cell and then use the switch to enable the power.
• Boot the Terminal:
- Once the generator is humming, find the Antenna Terminal nearby (look for a computer console with a screen).
- Interact with it to "boot" the system and complete the transmission.
• Extraction:
- After the terminal is active, proceed to an extraction point to finish the mission.
After Rain Comes
Objective
• Find the flooded solar panels nearby the Grandioso Apartments
• Repair the solar panels using 5 Wires and 2 Batteries
• Find the flooded solar panels nearby the Grandioso Apartments
• Repair the solar panels using 5 Wires and 2 Batteries
Reward
• 5x Blue Light Stick
• 3x Antiseptic
• 5x Durable Cloth
• 5x Blue Light Stick
• 3x Antiseptic
• 5x Durable Cloth
Map
• Buried City
• Buried City
How to Complete
• Locate the Solar Panels:
- Head to the area surrounding the Grandioso Apartments in the Buried City.
- Look for the flooded section (areas with standing water) where the solar panel arrays are installed.
• Gather Materials:
- Before you can complete the objective, you need to have 5 Wires and 2 Batteries in your inventory.
• Repair the Panels:
- Approach the damaged or sparking solar panels.
- Interact with the maintenance consoles to use your materials and complete the repairs.
• Extraction:
- Once the panels are back online, you must successfully extract to finalize the mission.
A Balanced Harvest
Objective
• Go to the Research & Administration building.
• Locate Lab 1 on the upper floor above the reception.
• Search for any traces of the agricultural research project.
• Go to the Research & Administration building.
• Locate Lab 1 on the upper floor above the reception.
• Search for any traces of the agricultural research project.
Reward
• 3x Advanced Mechanical Components
• 3x Medium Gun Parts
• 10x Steel Spring
• 3x Advanced Mechanical Components
• 3x Medium Gun Parts
• 10x Steel Spring
Map
• Dam Battlegrounds
• Dam Battlegrounds
How to Complete
• Reach the Research & Administration Building:
- Head to this landmark on the Dam Battlegrounds map. It is a large, multi-story office and lab complex.
• Locate Lab 1:
- Enter the building and find the main reception desk on the ground floor.
- Look for a staircase or ladder nearby to reach the upper floor directly above the reception area.
- Find the door marked "Lab 1."
• Search for Research Traces:
- Once inside Lab 1, look for a specific quest item or data pad labeled "Agricultural Research Project."
- It is usually on a workbench or near a computer terminal.
• Extraction:
- After you have collected the intel, you must successfully extract to save your progress and complete the mission.
Untended Garden
Objective
• Go to the Hydroponic Dome Complex
• Access the data archive in one of the domes
• Upload the data to the computer terminal in any Field Depot
• Go to the Hydroponic Dome Complex
• Access the data archive in one of the domes
• Upload the data to the computer terminal in any Field Depot
Reward
• 3x Advanced Mechanical Components
• 3x Heavy Gun Parts
• 5x Canister
• 3x Advanced Mechanical Components
• 3x Heavy Gun Parts
• 5x Canister
Map
• Dam Battlegrounds
• Dam Battlegrounds
How to Complete
• Reach the Hydroponic Dome Complex:
- Travel to the Hydroponic Dome Complex.
- These are large, glass-domed structures, usually found in more temperate or overgrown sectors of the map.
• Access the Data Archive:
- Enter one of the domes and look for a central computer unit or a server rack.
- Interact with it to download the Data Archive.
• Locate a Field Depot:
- Head to any Field Depot (marked by the radar icon on your map).
• Upload the Data:
- Find the computer terminal inside the Field Depot (usually on the upper floor or in the main control room).
- Interact with it to upload the archived data you just collected.
• Extraction:
- After the upload is complete, head to an extraction point to finish the mission.
The Root of the Matter
Objective
• Go to the Research Building
• Search for the seed vault in the "room with a great view"
• Deliver the Experimental Seed Sample to Celeste
• Go to the Research Building
• Search for the seed vault in the "room with a great view"
• Deliver the Experimental Seed Sample to Celeste
Reward
• 3x Advanced Mechanical Components
• 3x Heavy Gun Parts 3x Canister
• 3x Advanced Mechanical Components
• 3x Heavy Gun Parts 3x Canister
Map
• Buried City
• Buried City
How to Complete
• Go to the Research Building:
- Head to the Research & Administration building on the Dam Battlegrounds map.
• Find the "Room with a Great View":
- This refers to the top-floor office with large windows overlooking the surrounding landscape.
- You will likely need to navigate through the stairwells or use external ladders to reach the highest level.
• Search for the Seed Vault:
- Inside this upper office, locate a small, secure container known as the Seed Vault.
- Open it to retrieve the Experimental Seed Sample.
• Extraction:
- You must successfully extract with the seeds in your inventory.
Water Troubles
Objective
• Locate the Flood Access Tunnel under the Red Lake Balcony
• Find the intake to the District's Water Supply
• Sample the water
• Locate the Flood Access Tunnel under the Red Lake Balcony
• Find the intake to the District's Water Supply
• Sample the water
Reward
• 3x Mechanical Components
• 3x Simple Gun Parts
• 3x Steel Spring
• 3x Mechanical Components
• 3x Simple Gun Parts
• 3x Steel Spring
Map
• Dam Battlegrounds
• Dam Battlegrounds
How to Complete
• Locate the Flood Access Tunnel:
- Go to the Red Lake Balcony (a high vantage point overlooking the red water in the Dam Battlegrounds).
- Look for a path or ladder leading down to the Flood Access Tunnel located directly beneath the balcony structure.
• Find the Water Intake:
- Navigate through the tunnel until you reach the District's Water Supply intake.
- It usually looks like a large pipe or a mechanical filtration unit connected to the main water system.
• Sample the Water:
- Approach the intake and interact with it to "Sample the water."
- You will need to wait for a short interaction timer to fill the sample container.
• Extraction:
- After collecting the sample, you must successfully extract to bring the data back to Speranza.
Into the Fray
Objective
• Destroy a Leaper
• Obtain a Leaper Pulse Unit
• Destroy a Leaper
• Obtain a Leaper Pulse Unit
Reward
• 1 Radio Renegade (cosmetic)
• 1 Burgerboy (cosmetic)
• 1 Vulcano III
• 40x Shotgun Ammo
• 1 Radio Renegade (cosmetic)
• 1 Burgerboy (cosmetic)
• 1 Vulcano III
• 40x Shotgun Ammo
Map
• Any
• Any
How to Complete
• Locate a Leaper:
- Find a Leaper, a highly mobile ARC machine known for its jumping attacks and aggressive melee behavior.
- They are often found patrolling industrial areas or guarding extraction zones.
• Destroy the Leaper:
- Be careful, as Leapers move quickly and can close the distance in a single jump.
- Aim for their joints or glowing sensors to disable them.
- Using a weapon with a high fire rate or a shotgun is effective when they get close.
• Obtain the Leaper Pulse Unit:
- Once destroyed, the machine will drop a Leaper Pulse Unit.
- You must pick this up from the wreckage.
• Extraction:
- You must successfully extract with the Pulse Unit in your inventory to complete the mission.
Source of the Contamination
Objective
• Reach the Water Treatment Building in The Dam
• Search for the Flood Spill Intake near the Swamp
• Investigate any suspicious objects
• Reach the Water Treatment Building in The Dam
• Search for the Flood Spill Intake near the Swamp
• Investigate any suspicious objects
Reward
• 5x Steel Spring
• 5x Duct Tape
• 1x Mod Components
• 5x Steel Spring
• 5x Duct Tape
• 1x Mod Components
Map
• Dam Battlegrounds
• Dam Battlegrounds
How to Complete
• Reach the Water Treatment Building:
- Travel to The Dam region and enter the Water Treatment Building.
- This is a large industrial structure with many pipes and vats.
• Search the Flood Spill Intake:
- Head outside towards the Swamp area adjacent to the building.
- You need to locate the Flood Spill Intake, which looks like a large drainage pipe or gate where water flows into the marsh.
• Investigate Suspicious Objects:
- Look around the intake area for glowing containers, strange ARC canisters, or mechanical debris that doesn't belong there.
- Interact with these "suspicious objects" to gather evidence of the contamination.
• Extraction:
- Once you have investigated the site, head to an extraction point to bring the intel back to Speranza.
Switching the Supply
Objective
• Find the tunnels under the Spaceport
• Find and turn the valve in the tunnels under Spaceport
• Find the tunnels under the Spaceport
• Find and turn the valve in the tunnels under Spaceport
Reward
• 1x Radio Renegade Outfit (Blue)
• 1x Spaceport Warehouse Key
• 3x Synthesized Fuel
• 1x Radio Renegade Outfit (Blue)
• 1x Spaceport Warehouse Key
• 3x Synthesized Fuel
Map
• Spaceport
• Spaceport
How to Complete
• Locate the Tunnels:
- Head to the Spaceport map and find the entrance to the underground service tunnels.
- Look for open maintenance hatches or stairwells leading beneath the main landing pads or warehouses.
• Navigate the Underground:
- Once inside, follow the industrial piping.
- The tunnels can be dark and cramped, making them a prime spot for ARC Crawlers.
• Find and Turn the Valve:
- Search for a large, red mechanical valve attached to the main pipeline.
- Interact with it to "turn" the valve and redirect the supply.
• Extraction:
- After the objective updates, find your way back to the surface and proceed to an extraction point to finish the mission.
A Warm Place to Rest
Objective
• Locate the Abandoned Highway Camp
• Search for any signs of survivors
• Follow the red markers
• Inspect the grave
• Locate the Abandoned Highway Camp
• Search for any signs of survivors
• Follow the red markers
• Inspect the grave
Reward
• 3x Noisemaker
• 5x Blue Light Stick
• 3x Noisemaker
• 5x Blue Light Stick
Map
• Buried City
• Buried City
How to Complete
• Locate the Abandoned Highway Camp:
- Head to the Collapsed Highway area. Look for a small campsite with tents and
scattered supplies set up directly on or underneath the elevated road sections.
• Search for Signs of Survivors:
- Once at the camp, look for personal items like notes, abandoned backpacks, or cold campfires.
- Investigating these will trigger the next part of the quest.
• Follow the Red Markers:
- Look for red cloth strips or red paint marks on the environment (trees, rocks, or pillars).
- These markers form a trail leading away from the camp; follow them closely.
• Inspect the Grave:
- The trail will eventually lead you to a makeshift grave
(usually marked by a small mound of dirt and a simple wooden cross or stone).
- Interact with the grave to pay your respects and finish the investigation.
• Extraction:
- After inspecting the grave, head to an extraction point to complete the mission.
Prescriptions of the Past
Objective
• Visit the Departure Building in Spaceport
• Find the Medical Exam Room inside the Departure Building
• Search for the records
• Visit the Departure Building in Spaceport
• Find the Medical Exam Room inside the Departure Building
• Search for the records
Reward
• 1x Heavy Shield
• 1x Tactical Mk. 3 (Healing)
• 1x Heavy Shield
• 1x Tactical Mk. 3 (Healing)
Map
• Spaceport
• Spaceport
How to Complete
• Visit the Departure Building:
- Travel to the Spaceport map and locate the large Departure Building (the main terminal).
• Locate the Medical Exam Room:
- Enter the building and search the side corridors or upper levels.
- Look for a room marked with medical signs or white walls. This is the Medical Exam Room.
• Search for the Records:
- Inside the exam room, look for a specific quest item or a stack of files labeled "Medical Records."
- They are usually found on a desk, a metal cart, or inside a filing cabinet.
• Extraction:
- Once you have the records in your inventory, you must successfully extract from the map to secure the items.
Power Out
Objective
• Find the Electrical Substation south of the Spaceport, next to the Checkpoint
• Find any sign of the missing engineer
• Carry the fuse/battery back to the Electrical Substation
• Enable the power switch on the Fuse Box
• Find the Electrical Substation south of the Spaceport, next to the Checkpoint
• Find any sign of the missing engineer
• Carry the fuse/battery back to the Electrical Substation
• Enable the power switch on the Fuse Box
Reward
• 5x Wires
• 5x Explosive Compound
• 5x Oil
• 5x Wires
• 5x Explosive Compound
• 5x Oil
Map
• Spaceport
• Spaceport
How to Complete
• Locate the Electrical Substation:
- Head south of the Spaceport to find the Electrical Substation. It is situated right next to the Checkpoint landmark.
• Search for the Engineer:
- Look around the immediate area of the substation for the missing engineer.
- You will likely find their remains or an abandoned bag nearby, which triggers the next step.
• Retrieve and Carry the Component:
- Near the engineer's location, you will find a large Fuse or Battery.
- This is a heavy object, you must carry it back to the Substation by hand, which means you cannot
use your primary weapon while moving.
• Restore Power:
- Once at the substation, insert the component into the designated slot and interact with
the Power Switch on the Fuse Box to turn the lights back on.
• Extraction:
- After the power is restored, head to an extraction point to complete the mission.
Flickering Threat
Objective
• Find the Generator Room
• Repair the Generator
• Find the Ventilation Shaft
• Enable the power via the power switch underneath the stairs
• Find the Generator Room
• Repair the Generator
• Find the Ventilation Shaft
• Enable the power via the power switch underneath the stairs
Reward
• 5x Medium Gun Parts
• 3x Advanced Mechanical Components
• 5x Medium Gun Parts
• 3x Advanced Mechanical Components
Map
• Dam Battlegrounds
• Dam Battlegrounds
How to Complete
• Find the Generator Room:
- Enter the target building and navigate to the Generator Room (usually located in the basement or a central utility area).
• Repair the Generator:
- Approach the main generator unit.
- You will likely need basic mechanical components to interact with it and perform the repairs.
• Locate the Ventilation Shaft:
- Once the generator is humming, find the Ventilation Shaft.
- This is often a crawlspace or a large wall vent you need to enter or interact with to ensure air is circulating.
• Enable the Power Switch:
- Head to the stairwell area.
- Look underneath the stairs for a hidden or tucked-away breaker box.
- Interact with the Power Switch to fully restore the lights and systems.
• Extraction:
- After the power is stable, head to an extraction point to finish the mission.
Bees!
Objective
• Reach the Olive Grove in Blue Gate
• Search for bee hives around the Olive Grove
• Reach the Olive Grove in Blue Gate
• Search for bee hives around the Olive Grove
Reward
• 1x Advanced Electrical Components
• 3x Sensors
• 1x Advanced Electrical Components
• 3x Sensors
Map
• The Blue Gate
• The Blue Gate
How to Complete
• Reach the Olive Grove:
- Travel to the Blue Gate map and head to the Olive Grove landmark.
- This area is easily identified by its rows of ancient-looking trees and grassy terrain.
• Search for Bee Hives:
- Once you are in the grove, look closely at the trees.
- You are searching for Bee Hives hanging from the branches.
• Interact and Collect:
- Approach the hives and interact with them to gather honey or biological samples.
- Be Careful of ARC Units: While the grove looks peaceful, ARC drones often patrol the perimeter.
- Ensure the area is clear before you focus on searching the trees.
• Extraction: After you have found the required number of hives, proceed to an extraction point to complete the mission and keep your loot.
Espresso
Objective
• Find an espresso machine to salvage for spare parts
• Get the Espresso Machine Parts for Apollo
• Find an espresso machine to salvage for spare parts
• Get the Espresso Machine Parts for Apollo
Reward
• 1x Coffee Pot
• 3x Adrenaline Shot
• 1x Coffee Pot
• 3x Adrenaline Shot
Map
• Buried City
• Buried City
How to Complete
• Locate a Kitchen or Cafe:
- Head to urban or residential areas, specifically the Buried City or the Spaceport's lounge areas.
- You are looking for an Espresso Machine.
• Salvage for Parts:
- Once you find a machine (often sitting on counters in kitchens or cafeterias), interact with it to "salvage for spare parts."
• Obtain the Espresso Machine Parts:
- After salvaging, ensure the Espresso Machine Parts item is in your inventory.
Extraction:
- You must successfully extract with the parts to complete the mission.
Life of a Pharmacist
Objective
• Find the Arbusto Farmacia by the collapsed highway
• Document the pharmacist's hobbies
• Document the pharmacist's family
• Document the pharmacist's taste
• Document the pharmacist's skills
• Find the Arbusto Farmacia by the collapsed highway
• Document the pharmacist's hobbies
• Document the pharmacist's family
• Document the pharmacist's taste
• Document the pharmacist's skills
Reward
• 1x Defibrillator
• 1x Surge Shield Recharger
• 3x Sterilized Bandage
• 1x Defibrillator
• 1x Surge Shield Recharger
• 3x Sterilized Bandage
Map
• Buried City
• Buried City
How to Complete
• Locate Arbusto Farmacia:
- Head to the Buried City map.
- Find the pharmacy named Arbusto Farmacia, which is located right next to the Collapsed Highway landmark.
• Document Hobbies:
- Search the interior for personal items like sports gear, games, or books.
- Interact with these objects to "document" them.
• Document Family:
- Look for family photos, children's toys, or letters.
- Finding these will trigger the objective for the pharmacist's family history.
• Document Taste:
- Search for items that reflect personal style or preferences, such as specific records, posters, or branded luxury goods.
• Document Skills:
- Look for professional certificates, specialized medical tools, or complex handbooks that prove the pharmacist's expertise.
• Extraction:
- Once you have interacted with all four categories of items, extract successfully to bring the intel back to Speranza.
Lost in Transmission
Objective
• Visit Control Tower A6.
• Reach the top of Control Tower A6.
• Establish a connection from the terminal.
• Visit Control Tower A6.
• Reach the top of Control Tower A6.
• Establish a connection from the terminal.
Reward
• 1x Snap Hook
• 1x Snap Hook
Map
• Spaceport
• Spaceport
How to Complete
• Visit Control Tower A6:
- Head to the Control Tower A6 landmark.
- This is a tall, industrial structure that is usually heavily guarded by ARC patrols.
• Reach the Top:
- You must find the stairs or ladders to navigate all the way to the highest level of the tower.
- Be careful of snipers or drones that have a clear line of sight to you as you climb.
• Establish a Connection:
- Once you reach the top floor, locate the computer terminal.
- Interact with it to "Establish a connection." You will need to wait for a short progress bar to complete.
• Extraction:
- After the connection is active, the objective is complete.
- Proceed to an extraction point to finish the mission and save your progress.
Tribute to Toledo
Objective
• Get a Power Rod for Celeste
• Get a Power Rod for Celeste
Reward
• 5x Magnet
• 2x Advanced Mechanical Components
• 3x Synthesized Fuel
• 5x Magnet
• 2x Advanced Mechanical Components
• 3x Synthesized Fuel
Map
• Any
• Any
How to Complete
• Locate a Power Rod:
- You need to find a Power Rod, which is a rare technical component.
- These are most commonly found in Industrial Containers, Technical Crates, or near heavy machinery
and power substations.
Search Industrial Zones:
- The best places to look are the Spaceport or the Dam Battlegrounds' industrial sectors
(like the Research & Administration area).
Loot and Secure:
- Once you find the Power Rod, it will occupy a slot in your inventory.
- You must successfully extract from the map to keep the item.
Digging Up Dirt
Objective
• Locate the Santa Maria Houses in Old Town
• Locate the Dead Drop inside the courtyard
• Locate the Santa Maria Houses in Old Town
• Locate the Dead Drop inside the courtyard
Reward
• 2x Advanced Electrical Components
• 4x Speaker Component
• 2x Advanced Electrical Components
• 4x Speaker Component
Map
• Buried City
• Buried City
How to Complete
• Locate Santa Maria Houses:
- Head to the Old Town district in the Buried City.
- Find the Santa Maria Houses, which are a cluster of residential buildings with a central open area.
• Find the Courtyard:
- Enter the complex until you reach the inner courtyard.
- This area is often overgrown or filled with debris, so stay alert for any hiding ARC Crawlers.
• Locate the Dead Drop:
- Search the courtyard for a hidden container or a loose brick/panel known as the Dead Drop.
- It is usually tucked away in a corner or near a specific landmark like a fountain or a bench.
• Extraction:
- Once you have interacted with the Dead Drop and collected the intel, you must successfully
extract to complete the mission.
Turnabout
Objective
• Go to the North Trench Tower
• Locate and upload the blackmail files to Celeste
• Go to the North Trench Tower
• Locate and upload the blackmail files to Celeste
Reward
• 2x Heavy Gun Parts
• 2x Medium Gun Parts
• 2x Heavy Gun Parts
• 2x Medium Gun Parts
Map
• Spaceport
• Spaceport
How to Complete
• Reach North Trench Tower:
- Travel to the Spaceport map and locate the North Trench Tower.
- This is a tall structure situated near the industrial trenches.
Locate the Blackmail Files:
- Enter the tower and find the computer terminal containing the data.
- It is usually located on one of the upper floors in a secure office or control room.
Upload the Files:
- Interact with the terminal to begin the upload process.
- You must stay near the console until the progress bar is full.
Extraction:
- Once the upload is confirmed, the objective is complete.
- Head to an extraction point to bring the successful hack back to Speranza.
Building a Library
Objective
• Locate the Library in the City Center
• Find 1 romance book
• Find 1 detective book
• Find 1 adventure book
• Deliver 3 books to Apollo
• Locate the Library in the City Center
• Find 1 romance book
• Find 1 detective book
• Find 1 adventure book
• Deliver 3 books to Apollo
Reward
• 1x Jolt Mine
• 1x Heavy Fuze Grenade
• 1x Jolt Mine
• 1x Heavy Fuze Grenade
Map
• Buried City
• Buried City
How to Complete
• Locate the Library:
- Head to the City Center district in the Buried City.
- Find the Library building, look for large "Library" signs or a building with many bookshelves visible through the windows.
• Find the Specific Genres:
- Search the shelves and book piles inside to find three specific types of books:
- 1 Romance book
- 1 Detective book
- 1 Adventure book
• Loot and Secure:
- Each book is a quest item. Once you have all three, they will occupy space in your inventory.
• Extraction:
- You must successfully extract with all three books to complete the objective.
A New Type of Plant
Objective
• Search for the new plant near the Baron Husk in the Old Battleground
• Deliver the Possibly Toxic Plant to Lance
• Search for the new plant near the Baron Husk in the Old Battleground
• Deliver the Possibly Toxic Plant to Lance
Reward
• 1x Vita Shot
• 5x Antiseptic
• 1x Vita Shot
• 5x Antiseptic
Map
• Dam Battlegrounds
• Dam Battlegrounds
How to Complete
• Locate the Baron Husk:
- Travel to the Old Battleground area.
- Find the Baron Husk, which is the massive, rusted wreckage of a giant four-legged ARC machine.
Search for the Plant:
- Look around the base of the wreckage.
- The Possibly Toxic Plant usually grows in the soil directly underneath or immediately surrounding
the mechanical "legs" of the husk.
- It often has a distinct glow or color that stands out from the mud.
•Collect and Secure:
- Pick up the plant. Be careful, as the area around the husk is very open and often patrolled by ARC drones.
•Extraction:
- You must successfully extract with the plant in your inventory.
Armored Transports
Objective
• Reach the Checkpoint
• Search the Guard huts for a Armored Patrol Key Card
• Reach the Traffic Tunnel near the Blue Gate Checkpoint
• Find and unlock the rear door of an armored patrol car
• Reach the Checkpoint
• Search the Guard huts for a Armored Patrol Key Card
• Reach the Traffic Tunnel near the Blue Gate Checkpoint
• Find and unlock the rear door of an armored patrol car
Reward
• 3x Smoke Grenade
• 3x Defibrillator
• 3x Smoke Grenade
• 3x Defibrillator
Map
• The Blue Gate
• The Blue Gate
How to Complete
• Reach the Checkpoint:
- Head to the Checkpoint landmark, which is a fortified gate area often guarded by turrets and drones.
• Find the Key Card:
- Search the small Guard Huts (security booths) located around the checkpoint.
- You are looking for the Armored Patrol Key Card, usually found on a desk or in a wall locker.
• Locate the Traffic Tunnel:
- Move toward the Traffic Tunnel located near the Blue Gate Checkpoint.
- Inside the tunnel, you will find several abandoned vehicles.
• Unlock the Armored Car:
- Find the specific Armored Patrol Car (it looks like a heavy, reinforced military vehicle).
- Approach the rear door and use the Key Card to unlock it.
• Extraction:
- Once you have unlocked the door and retrieved whatever is inside, head to an extraction point to finish the mission.
In My Image
Objective
• Deploy into Stella Montis
• Find and search 3 Androids
• Deploy into Stella Montis
• Find and search 3 Androids
Reward
• 1x Looting Mk.2
• 5x Green Light Stick
• 1x Looting Mk.2
• 5x Green Light Stick
Map
• Stella Montis
• Stella Montis
How to Complete
• Deploy into Stella Montis:
- Start a raid and head to the Stella Montis region.
- This area is characterized by its high elevation, snowy peaks, and rocky terrain.
• Locate Androids:
- Search for Androids.
- Unlike the typical mechanical ARC units, these look more humanoid but are often
deactivated or slumped against walls and debris.
• Search 3 Androids:
- Approach the androids and interact with them to "search" their systems.
- You need to find and search three of them to complete the objective.
• Extraction:
- Once you have searched the third android, proceed to an extraction point to secure your progress.
Cold Storage
Objective
• Search any J Kozma Ventures container.
• Deliver the Rare Books to Shani.
• Search any J Kozma Ventures container.
• Deliver the Rare Books to Shani.
Reward
• 3x Gas Mine
• 1x Raider Hatch Key
• 3x Gas Mine
• 1x Raider Hatch Key
Map
• Stella Montis
• Stella Montis
How to Complete
• Locate J. Kozma Ventures Containers:
- Look for shipping containers or crates marked with the J. Kozma Ventures logo.
- These are most commonly found in logistics hubs like the Spaceport or the Warehouse Complex near the Blue Gate.
• Search for Rare Books:
- Interact with these specific containers.
- They have a chance to drop the quest item: Rare Books. You may need to open several containers before the books appear.
• Secure the Items:
- Once you have the Rare Books, they will take up space in your inventory.
- You must successfully extract to keep them.
Snap and Salvage
Objective
• Take a Photo of any of the Rovers in the Sandbox
• Search the papers in the Security Checkpoint room by the Lobby
• Deliver a Magnetron to Tian Wen
• Deliver a Flow Controller to Tian Wen
• Take a Photo of any of the Rovers in the Sandbox
• Search the papers in the Security Checkpoint room by the Lobby
• Deliver a Magnetron to Tian Wen
• Deliver a Flow Controller to Tian Wen
Reward
• 1x Burletta III
• 1x Silencer II
• 1x Extended Light Mag II
• 100x Light Ammo
• 1x Burletta III
• 1x Silencer II
• 1x Extended Light Mag II
• 100x Light Ammo
Map
• Stella Montis
• Stella Montis
How to Complete
• Photo Op in the Sandbox:
- Head to the Sandbox area (usually found in the Spaceport map).
- Use your in-game camera to take a photo of any Rover (the large mechanical vehicles).
- Make sure the vehicle is clearly in frame.
• Retrieve the Papers:
- Locate the Security Checkpoint room near the Lobby entrance.
- Search the desks or filing cabinets inside to find the specific quest documents.
• Gather Technical Parts: You need to scavenge two specific industrial items:
- 1 Magnetron: Commonly found in microwave units, industrial machinery, or technical crates.
- 1 Flow Controller: Often found in utility closets, near plumbing/ventilation systems, or in mechanical toolboxes.
• Extraction:
- You must successfully extract with both the papers and the hardware (Magnetron and Flow Controller) in your inventory.
The Clean Dream
Objective
• On Spaceport, search 4 containers in the underground tunnels
• Find and monitor any Filtration System in the tunnels
• On The Blue Gate, visit the Maintenance Bunker
• On Spaceport, search 4 containers in the underground tunnels
• Find and monitor any Filtration System in the tunnels
• On The Blue Gate, visit the Maintenance Bunker
Reward
• 1x Deadline
• 3x Showstopper
• 3x Heavy Fuze grenade
• 1x Deadline
• 3x Showstopper
• 3x Heavy Fuze grenade
Map
• Spaceport, The Blue Gate
• Spaceport, The Blue Gate
How to Complete
• Spaceport - Enter the service tunnels beneath the Spaceport. You need to find and search 4 containers (look for toolboxes, lockers, or crates) scattered throughout the subterranean corridors.
• Monitor the Filtration System:
- While in those same tunnels, locate a Filtration System (large industrial machinery with pipes and tanks).
- Interact with the control panel to "monitor" the system; you may need to wait for a progress bar to finish.
• The Blue Gate - Travel to The Blue Gate map and locate the Maintenance Bunker.
- You simply need to reach the entrance or enter the interior for the objective to trigger.
• Extraction:
- You must successfully extract after completing the objectives on each map to save your progress. You can do the Spaceport and Blue Gate portions in separate raids.
A Toxic Trail
Objective
• Return to the water intake below the Water Treatment Control building
• Search the swamp for traces of the barrel's origins
• Take a photo of the barrel truck
• Search the truck for clues about the saboteur's identity.
• Return to the water intake below the Water Treatment Control building
• Search the swamp for traces of the barrel's origins
• Take a photo of the barrel truck
• Search the truck for clues about the saboteur's identity.
Reward
• 1x Tactical Mk.2
• 3x Zipline
• 3x Pulse Mine
• 3x Gas Mine
• 1x Tactical Mk.2
• 3x Zipline
• 3x Pulse Mine
• 3x Gas Mine
Map
• Dam Battlegrounds
• Dam Battlegrounds
How to Complete
• Return to the Water Intake:
- Head back to the Water Treatment area in The Dam.
- Go to the water intake located directly below the Control Building to re-examine the site.
• Search the Swamp:
- Move into the nearby Swamp.
- Look for signs or debris (tracks, oil spills, or chemical residue) that indicate where the toxic barrels were brought from.
• Photo Op (Barrel Truck):
- Find the abandoned truck loaded with barrels.
- Use your in-game camera to take a photo of the vehicle.
- Ensure the truck and its cargo are clearly visible in the frame.
• Investigate the Saboteur:
- Approach the truck and search the cabin or the cargo bed for personal items, documents,
or IDs that might reveal who is responsible for the sabotage.
• Extraction:
- After gathering the clues and the photo, extract successfully to bring the evidence back to Speranza.
Paving The Way
Objective
• Go to any ENELICA building
• Search for a notice board with a note from the researcher
• On Buried City, reach the top floor above the Convinio in Piazza Roma
• Find the researcher's flat and search for any research data
• Go to any ENELICA building
• Search for a notice board with a note from the researcher
• On Buried City, reach the top floor above the Convinio in Piazza Roma
• Find the researcher's flat and search for any research data
Reward
• 1x Raider Hatch Key
• 3x Seeker Grenade
• 1x Advanced Electrical Components
• 1x Raider Hatch Key
• 3x Seeker Grenade
• 1x Advanced Electrical Components
Map
• Dam Battlegrounds, The Blue Gate, Buried City
• Dam Battlegrounds, The Blue Gate, Buried City
How to Complete
• Visit an ENELICA Building:
- Head to any building marked with the ENELICA logo (the utility/power company).
- There are several across the maps, but the one in the Buried City is often the easiest to access.
• Search the Notice Board:
- Look for a notice board in the lobby or main hallway of the ENELICA building.
- Interact with it to find a note left by the researcher; this will provide the location of their flat.
• Reach Piazza Roma:
- Travel to Piazza Roma in the Buried City.
- Locate the Convinio shop (a small convenience store).
• Find the Researcher's Flat:
- Climb to the top floor of the building directly above the Convinio.
- Enter the flat and search the rooms (check desks and laptops) for the Research Data.
• Extraction:
- Once you have retrieved the data, you must successfully extract to secure the intel.
The Stench Of Corruption
Objective
• Reach the southwest lobby of the Departure Building
• Find the staff locker room
• Search the room for any clues of the saboteur's identity
• Reach the tunnels below the Spaceport
• Use the key on any Flushing Terminal to override the bypass protocol
• Reach the southwest lobby of the Departure Building
• Find the staff locker room
• Search the room for any clues of the saboteur's identity
• Reach the tunnels below the Spaceport
• Use the key on any Flushing Terminal to override the bypass protocol
Reward
• Warden Outfit (Blue Color)
• 1x Air Freshener
• 1x Dam Staff Room Key
• 3x Noisemaker
• Warden Outfit (Blue Color)
• 1x Air Freshener
• 1x Dam Staff Room Key
• 3x Noisemaker
Map
• Spaceport
• Spaceport
How to Complete
• Reach the Southwest Lobby:
- Enter the Departure Building at the Spaceport and head to the southwest lobby area.
• Find the Staff Locker Room:
- Locate the door leading to the staff locker room within this lobby section.
• Search for Clues:
- Search the lockers and benches inside the room. You are looking for a key or a document that identifies the saboteur.
• Enter the Tunnels:
- Head to the service tunnels located beneath the Spaceport.
• Override the Protocol:
- Find a Flushing Terminal (a control console) inside the tunnels.
- Use the key you found earlier to override the bypass protocol.
• Extraction:
- Once the override is complete, the objective is done. Extract successfully to save your progress.
Deciphering The Data
Objective
• Use the Magnetic Decryptor in the Fuel Control Building
• Reach the Arrival Building in Spaceport
• Use the Magnetic Decryptor on the top floor of the Arrival Building
• Use the Magnetic Decryptor in the Fuel Control Building
• Reach the Arrival Building in Spaceport
• Use the Magnetic Decryptor on the top floor of the Arrival Building
Reward
• 3x Defibrillator
• 3x Trailblazer
• 3x Defibrillator
• 3x Trailblazer
Map
• Spaceport
• Spaceport
How to Complete
• Fuel Control Building:
- Head to the Fuel Control Building (typically located near the Spaceport or industrial sectors).
- Find the main terminal and use the Magnetic Decryptor from your inventory to begin the first decryption process.
• Reach the Arrival Building:
- Travel to the Arrival Building at the Spaceport.
- This is a large terminal often heavily guarded by ARC patrols.
• Top Floor Decryption:
- Navigate to the top floor of the Arrival Building.
- Locate the computer console and use the Magnetic Decryptor again to finalize the data recovery.
• Extraction:
- Once both decryptions are complete, you must successfully extract to bring the deciphered data back to Speranza.
Groundbreaking
Objective
• Enter the locked room at Pilgrim's Peak
• Search the room for any construction research
• Find the building pictured on the whiteboard
• Photograph the abounded housing project
• Enter the locked room at Pilgrim's Peak
• Search the room for any construction research
• Find the building pictured on the whiteboard
• Photograph the abounded housing project
Reward
• Warden Outfit (Tangerine Color)
• 1x Power Rod
• Warden Outfit (Tangerine Color)
• 1x Power Rod
Map
• The Blue Gate
• The Blue Gate
How to Complete
• Enter the Locked Room: Head to Pilgrim's Peak (a high-altitude mountain area). Locate the specific building with the locked room. You may need to find a key nearby or find an alternative entry point like a window or a vent.
• Search for Research:
- Once inside the room, search the desks and cabinets for construction research documents.
• Identify the Target:
- Look at the whiteboard inside the room. It contains a picture or a map of a specific building.
- You need to identify this location, it is the abandoned housing project
(The Su Durante apartments or similar ruins in the vicinity).
• Photograph the Project:
- Travel to that housing project and use your in-game camera to take a photo of the structures.
- Ensure the buildings are centered in the frame.
• Extraction:
- After taking the photo and securing the documents, extract successfully to complete the mission.
Combat Recon
Objective
• Scope out a cover spot in the Parking Garage staircases
• Scope out a cover spot in the buses near Marano Park
• Scope out a cover spot in the attics around Main Street
• Destroy 2 Spotters
• Deliver a Spotter Relay to Shani
• Scope out a cover spot in the Parking Garage staircases
• Scope out a cover spot in the buses near Marano Park
• Scope out a cover spot in the attics around Main Street
• Destroy 2 Spotters
• Deliver a Spotter Relay to Shani
Reward
• Radio Renegade Outfit (Red Color)
• 5× Firecracker
• 1× Fireworks Box
• Radio Renegade Outfit (Red Color)
• 5× Firecracker
• 1× Fireworks Box
Map
• Buried City
• Buried City
How to Complete
• Scope out Cover Spots:
- You need to visit three specific locations to "mark" them as safe zones.
- Simply reach the exact spot until the objective triggers:
- Parking Garage: Head to the internal staircases of the garage.
- Marano Park: Find the cluster of abandoned buses near the park.
- Main Street: Climb into the attics of the residential buildings along the main road.
• Destroy 2 Spotters:
- Hunt down two Spotters.
- These are small, hovering ARC drones that act as scouts.
- They are usually found patrolling high above streets or near landmarks.
• Obtain a Spotter Relay:
- Once a Spotter is destroyed, pick up the Spotter Relay it drops.
• Extraction:
- You must successfully extract with the Spotter Relay in your inventory.
A Prime Specimen
Objective
• Obtain 2 ARC Powercells
• Interact with any ARC Deforester
• Loot an ARC Deforester
• Obtain 2 ARC Powercells
• Interact with any ARC Deforester
• Loot an ARC Deforester
Reward
• 1× Patrol Car Key
• 3× Door Blocker
• 1× Patrol Car Key
• 3× Door Blocker
Map
• The Blue Gate
• The Blue Gate
How to Complete
• Gather Powercells:
- First, ensure you have 2 ARC Powercells in your inventory.
- These are rare mechanical drops often found by destroying medium-to-large ARC units (like Rocketeers or Surveyors)
or looting high-tier industrial crates.
• Locate an ARC Deforester:
- Find a Deforester, a large, multi-legged ARC unit usually found in wooded areas or near the Olive Grove.
- It is a powerful enemy that uses lasers to clear vegetation.
• Interact with the Deforester:
- You need to get close to the machine to interact with it.
- This is extremely dangerous while it is active; you may need to stun it or wait for a specific animation cycle
to trigger the interaction.
• Loot the Deforester:
- After the interaction (or after destroying it, depending on the current quest state), you must loot the core of the machine to gather the required "specimen" data.
• Extraction:
- You must successfully extract with the items to complete the mission.
On Deaf Ears
Objective
• Find the researcher's guest logs on the reception computers
• Find where the researcher held their lecture, and access their notes
• Find information about the prototypes on the Medical Research computers
• Find the printed shipping logs in the Assembly Workshops
• Find the researcher's guest logs on the reception computers
• Find where the researcher held their lecture, and access their notes
• Find information about the prototypes on the Medical Research computers
• Find the printed shipping logs in the Assembly Workshops
Reward
• Warden Outfit (Navy Blue Color)
• 3× Lure Grenade
• 5× Noisemaker
• 1× Shaker
• Warden Outfit (Navy Blue Color)
• 3× Lure Grenade
• 5× Noisemaker
• 1× Shaker
Map
• Stella Montis
• Stella Montis
How to Complete
• Search Reception Computers:
- Head to the main entrance of the research facility. Access the reception computers to retrieve the Guest Logs.
• Find the Lecture Hall:
- Locate the auditorium or lecture hall inside the building.
- Look for the podium or front desk to access the researcher's lecture notes.
• Access Medical Research Computers:
- Navigate to the Medical Research wing.
- Use the computer terminals there to find classified information about the prototypes.
• Retrieve Shipping Logs:
- Go to the Assembly Workshops (the industrial/manufacturing section).
- Look for a physical stack of printed shipping logs on a workbench or near the loading bay.
• Extraction:
- Once you have gathered all four pieces of intel, you must successfully extract to secure the data.
The League
Objective
• Deliver a Deflated Football to Apollo
• Deliver a Bicycle Pump for Apollo
• On Dam Battlegrounds, photograph the goal by the Water Towers
• On Buried City, photograph the football magazines in any kiosk
• Search for a Deflated Football
• Search for a Bicycle Pump
• Deliver a Deflated Football to Apollo
• Deliver a Bicycle Pump for Apollo
• On Dam Battlegrounds, photograph the goal by the Water Towers
• On Buried City, photograph the football magazines in any kiosk
• Search for a Deflated Football
• Search for a Bicycle Pump
Reward
• Aviator Outfit (Faded Flush)
• 5× Tagging Grenade
• 5× Firecracker
• Aviator Outfit (Faded Flush)
• 5× Tagging Grenade
• 5× Firecracker
Map
• Dam Battlegrounds, Buried City
• Dam Battlegrounds, Buried City
How to Complete
• Scavenge for Equipment:
- You need to find two specific items:
- Deflated Football: Usually found in residential areas, schools, or playgrounds in the Buried City.
- Bicycle Pump: Often found in garages, workshops, or sheds across all maps.
• Photo Ops:
- The Goal (Dam Battlegrounds): Head to the Water Towers.
Find the makeshift football goal nearby and take a photo of it.
• Football Magazines (Buried City):
- Find any street kiosk (small newsstands).
- Look for magazines on the shelves and take a photo.
• Extraction:
- You must successfully extract with the Football and the Bicycle Pump in your inventory for them to count.
With A View
Objective
• Obtain a Rotary Encoder
• Visit any of the Control Rooms near the Assembly Line
• Use the Rotary Encoder to activate the server switch
• Interact with a nearby computer to help identify the correct paths
• Deliver an Ion Sputter to Shani
• Obtain a Rotary Encoder
• Visit any of the Control Rooms near the Assembly Line
• Use the Rotary Encoder to activate the server switch
• Interact with a nearby computer to help identify the correct paths
• Deliver an Ion Sputter to Shani
Reward
• 5× Steel Spring
• 5× Wires
• 1× Tactical Mk. 2
• 5× Steel Spring
• 5× Wires
• 1× Tactical Mk. 2
Map
• Stella Montis
• Stella Montis
How to Complete
• Obtain a Rotary Encoder:
- First, you need a Rotary Encoder.
- These are technical components commonly found in Toolboxes, Industrial Crates, or salvaged
from destroyed ARC Surveyors.
• Visit a Control Room:
- Head to the Assembly Line (usually in the Spaceport or Dam industrial zones).
- Locate one of the elevated Control Rooms overlooking the factory floor.
• Activate the Server Switch:
- Inside the control room, find the server rack or power console and use the Rotary Encoder to bridge
the connection and flip the switch.
• Identify the Paths:
- Interact with a nearby computer terminal.
- This will trigger a short puzzle or data sequence that "identifies the correct paths" for the facility's internal systems.
• Retrieve and Deliver:
- Once the path is clear, locate the Ion Sputter (which may spawn nearby or in a connected storage room).
- Extract successfully with the Ion Sputter.
On the Map
Objective
• Head to where the Fuel Lines snapped, and transmit your location
• Head to the antenna near the Fuel Control, and transmit your location
• Head to the cactus patch in the wall breach, and transmit your location
• Transmit your location from the roof of the Container Storage building
• Find the container covered in tarp, and mark it
Reward
• 3× Sterilized Bandage
• 3× Surge Shield Recharger
• 1× Tactical Mk. 3 (Healing)2
• 3× Sterilized Bandage
• 3× Surge Shield Recharger
• 1× Tactical Mk. 3 (Healing)2
Map
• Spaceport
• Spaceport
How to Complete
• Transmit Your Location (4 spots):
- You must visit four specific locations and interact with your personal transmitter (or a prompt on the HUD) to "ping" your coordinates:
1. Snapped Fuel Lines: Find the section of the pipeline that is broken and leaking.
2. Antenna near Fuel Control: Head to the small relay antenna located within the perimeter of the Fuel Control building.
3. Cactus Patch: Look for the breach in the outer wall (usually near the desert/perimeter area) where
a cluster of cacti is growing.
4. Container Storage Roof: Climb to the very top of the Container Storage building.
• Mark the Tarped Container:
- Search the yard for a specific shipping container that is covered in a large tarp. Stand next to it and use the "Mark" interaction.
• Extraction:
- Once all locations are transmitted and the container is marked, head to an extraction point to finalize the mission.
Bombing Run
Objective
• Destroy a Bombardier
• Deliver a Bombardier Cell to Shani
• Destroy a Bombardier
• Deliver a Bombardier Cell to Shani
Reward
• Finger Gun Single Shot Emote
• 30× Raider Tokens
• Finger Gun Single Shot Emote
• 30× Raider Tokens
Map
• Any
• Any
How to Complete
• Locate a Bombardier:
- Find a Bombardier, a heavy ARC machine known for launching long-range mortars and explosive shells.
- They are usually found in open combat zones or guarding the perimeter of Field Depots.
• Destroy the Bombardier:
- These units are heavily armored. Focus your fire on their glowing vents or the mortar launcher on their back.
- Use cover to avoid their overhead explosive strikes, as they deal massive splash damage.
• Obtain the Bombardier Cell:
- Once the machine is destroyed, it will drop a Bombardier Cell. Pick this up from the wreckage.
• Extraction:
- You must successfully extract with the Bombardier Cell in your inventory.
- Be careful, as these items are sometimes heavy and can make you a high-priority target for other players.
Movie Night
Objective
• Deliver a Portable TV to Apollo
• On Stella Montis, search the Cultural Archives for old movie tapes
• Deliver the Stack Of Movie Tapes to Apollo
• Deliver a Portable TV to Apollo
• On Stella Montis, search the Cultural Archives for old movie tapes
• Deliver the Stack Of Movie Tapes to Apollo
Reward
• 3× Showstopper
• 3× Smoke Grenade
• 1× Fireworks Box
• 3× Showstopper
• 3× Smoke Grenade
• 1× Fireworks Box
Map
• Any
• Any
How to Complete
• Find a Portable TV:
- Scavenge for a Portable TV.
- These are typically found in residential areas, apartments, or small electronics shops in the Buried City.
• Go to Stella Montis:
- Deploy to the Stella Montis map (the snowy mountain region).
• Search the Cultural Archives:
- Locate the Cultural Archives building. Inside, look for shelves or storage bins to find the Stack of Movie Tapes.
• Extraction:
- You must successfully extract with both the Portable TV and the Movie Tapes in your inventory.
- You can collect them in separate runs, but they must be extracted to count.
Stable Housing
Objective
• Go to the Security Bridge
• Search for the safe in the side room by the third-floor staircases
• Head upstairs to the fourth-floor control room
• Use the Access Card Printer to print a key to the safe
• Search for alternate ways into the safe
• Retrieve the contents of the safe
• Deliver the Project Heartwood Blueprints to Tian Wen
Reward
• 5× Seeker Grenade
• 5× Lure Grenade
• 1× Snap Hook
• 5× Seeker Grenade
• 5× Lure Grenade
• 1× Snap Hook
Map
• Stella Montis
• Stella Montis
How to Complete
• Reach the Security Bridge:
- Head to the Security Bridge landmark. This is a high-traffic area, so watch for ARC patrols on the walkways.
• Locate the Safe:
- Go to the third floor. Search the small side room located right next to the main stairwell to find the locked safe.
• Get the Key:
- Since the safe is locked, head up to the fourth-floor control room. Find the Access Card Printer and interact with it to generate a key card.
• Alternative Entry:
- The mission will prompt you to "search for alternate ways" into the safe—this usually involves checking a specific terminal or vent nearby to bypass a secondary lock.
• Retrieve the Blueprints:
- Go back to the safe on the third floor, unlock it, and pick up the Project Heartwood Blueprints.
• Extraction:
- You must successfully extract with the blueprints in your inventory.
Worth Your Salt
Objective
• Go to the Rocket Assembly
• Search for the hidden Battery Prototype in a high place
• Bring the Battery Prototype to the Industrial Recharger
• Use the machinery to charge the battery
• Deliver the Charged Battery to the drop-off point in the corner
• Go to the Rocket Assembly
• Search for the hidden Battery Prototype in a high place
• Bring the Battery Prototype to the Industrial Recharger
• Use the machinery to charge the battery
• Deliver the Charged Battery to the drop-off point in the corner
Reward
• 1× Vita Spray Blueprint
• 1× Vita Spray Blueprint
Map
• Spaceport
• Spaceport
How to Complete
• Locate Salt Supplies:
- You need to find and collect 3 units of Salt.
• Search Residential & Kitchen Areas:
- Salt is most commonly found in Kitchens, Pantries, and Dining Areas within the Buried City or
residential buildings near the Dam.
• Loot Small Containers:
- Look inside Coolers, Lunchboxes, and Kitchen Cabinets.
- It is a common loot item, but you need to specifically target food-related containers.
• Extraction:
- You must successfully extract with the 3 Salt units in your inventory to complete the mission.
Keeping an Eye Out
Objective
• Locate the collapsed highway by the southern edge of the Barren Clearing
• Find Bilguun's shelter, and search for any clues of his presence
• Locate the collapsed highway by the southern edge of the Barren Clearing
• Find Bilguun's shelter, and search for any clues of his presence
Reward
• 5× Pulse Mine
• 1× Flame Spray
• 5× Pulse Mine
• 1× Flame Spray
Map
• The Blue Gate
• The Blue Gate
How to Complete
• Locate the Collapsed Highway:
- Head to the southern edge of the Barren Clearing. Look for the section of the collapsed highway that
marks the boundary of this zone.
• Find Bilguun's Shelter:
- Search the area underneath or immediately adjacent to the highway ruins.
- You are looking for a small, makeshift shelter (look for a lean-to, some crates, or a sleeping bag).
• Search for Clues:
- Once you find the shelter, interact with the items inside (such as a notebook, a radio, or personal belongings) to find clues of Bilguun's presence.
• Extraction:
- After the objective updates, head to an extraction point to bring the information back to base.
A Dead End
Objective
• Find MANTIKOR's underground facilities
• Search the locked room for any records on Project Heartwood
• Find the Dusty Film Reel
• Deliver the Dusty Film Reel to Shani
• Find MANTIKOR's underground facilities
• Search the locked room for any records on Project Heartwood
• Find the Dusty Film Reel
• Deliver the Dusty Film Reel to Shani
Reward
• Patchwork (Warden Color)
• 2000× Coins
• Patchwork (Warden Color)
• 2000× Coins
Map
• The Blue Gate
• The Blue Gate
How to Complete
• Locate MANTIKOR’s Underground Facility:
- Head to the marked entrance leading beneath the surface.
- These facilities are often hidden within industrial complexes or behind heavy blast doors.
• Search the Locked Room:
- Once inside the facility, find the secure records room.
- You may need to find a key nearby or hack a terminal to open the door.
- Search the shelves for information on Project Heartwood.
• Find the Dusty Film Reel:
- While searching the records, look specifically for the Dusty Film Reel.
- It is a unique quest item usually sitting on a projector stand or inside an old film canister.
• Extraction:
- You must successfully extract with the Dusty Film Reel in your inventory.
A Rising Tide
Objective
• On Buried City, find the foreman's barricaded apartment south of Piazza Roma
• Access the foreman's digital logbook
• On Dam Battlegrounds, reach the Power Generation Complex
• Find a way into the Controlled Access Zone
• Search the Controlled Access Zone for any clues about the foreman's reconstruction project
Reward
• 1× Anvil II
• 1× Anvil Splitter
• 1× Extended Barrel
• 40× Heavy Ammo
• 1× Anvil II
• 1× Anvil Splitter
• 1× Extended Barrel
• 40× Heavy Ammo
Map
• Buried City
• Dam Battlegrounds
• Buried City
• Dam Battlegrounds
How to Complete
• Buried City - Head south of Piazza Roma and look for a residential building.
- You need to find the barricaded apartment (the windows/doors will be boarded up).
- Break through or find a side entrance to get inside.
• Digital Logbook:
- Once inside the apartment, locate the computer or tablet and interact with it to access the foreman's digital logbook.
• Dam Battlegrounds - Travel to the Power Generation Complex (the large industrial area with turbines and generators).
• Controlled Access Zone:
- Find the Controlled Access Zone within the complex.
- This area is usually fenced off or locked.
- You may need to find a keycard nearby or crawl through a ventilation shaft to get in.
• Search for Clues:
- Inside the zone, search the desks and filing cabinets for blueprints or documents related to the reconstruction project.
• Extraction:
- Successfully extract from the map to secure the intel and complete the mission.
Outstanding Balance
Objective
• Search for Dodger's stash inside the Traffic Tunnel
• Search Dodger's deal spot by the Pilgrim's Peak antenna
• Deliver Dodger's Note to Tian Wen
• Search for Dodger's stash inside the Traffic Tunnel
• Search Dodger's deal spot by the Pilgrim's Peak antenna
• Deliver Dodger's Note to Tian Wen
Reward
• Aviator Outfit (Gothic Graffiti Color)
• 1× Extended Medium Mag III
• 1× Silencer II
• Aviator Outfit (Gothic Graffiti Color)
• 1× Extended Medium Mag III
• 1× Silencer II
Map
• The Blue Gate
• The Blue Gate
How to Complete
• Search the Traffic Tunnel:
- Head to the Traffic Tunnel (usually near the Blue Gate or the industrial outskirts).
- Search the side alcoves, abandoned vehicles, or maintenance rooms within the tunnel to find Dodger's Stash.
• Visit Pilgrim's Peak:
- Travel to the high-altitude area of Pilgrim's Peak. Locate the large Communications Antenna at the summit.
• Search the Deal Spot:
- Look around the base of the antenna or the nearby small utility shack for Dodger's Deal Spot. You are looking for a specific item: Dodger's Note.
• Extraction:
- You must successfully extract with the note in your inventory to secure the mission progress.
Clamoring for Attention
Objective
• Use 3 Wires to repair and sound the emergency siren by the Warehouse Complex
• Use a Battery to start the boom box in the Village
• Sound any bus horn by the Checkpoint
• Use 3 Wires to repair and sound the emergency siren by the Warehouse Complex
• Use a Battery to start the boom box in the Village
• Sound any bus horn by the Checkpoint
Reward
• 5× Lure Grenade
• 5× Noisemaker
• 3× Tagging Grenade
• 5× Lure Grenade
• 5× Noisemaker
• 3× Tagging Grenade
Map
• The Blue Gate
• The Blue Gate
How to Complete
• Emergency Siren (Warehouse Complex):
- Head to the Warehouse Complex. Locate the emergency siren tower or console.
- You will need 3 Wires in your inventory to repair it. Interact with the device to sound the alarm.
• Boom Box (The Village):
- Travel to The Village. Find the large Boom Box (usually located in the central square or near a communal area).
- You must have 1 Battery to power it up and start the music.
• Bus Horn (The Checkpoint):
- Go to the Checkpoint landmark. Look for any of the abandoned buses scattered around the area.
- Enter the driver's seat or interact with the front of the bus to "Sound the horn."
• Extraction:
- Once all three noise-making tasks are complete, head to an extractions point to finish the mission.
Dust on the Wires
Objective
• Vist any Field Depot on the eastern side of the Spaceport
• Use the Field Radio to transmit the scout group's last log to Shani
• Interact with the terminal in the old Raider Tower north of the Maintenance Hanger
• Find traces of the scout patrol near the Maintenance Hanger
• Search the remains left by the scouts
• Deliver the Scout Patrol Note to Shani
Reward
• Backpack Charm (Fax Machine)
• Backpack Charm (Fax Machine)
Map
• Spaceport
• Spaceport
How to Complete
• Visit the Eastern Field Depot:
- Head to the Spaceport map and locate a Field Depot on the eastern side of the facility.
• Transmit the Log:
- Once inside the depot, find the Field Radio. Interact with it to transmit the scout group's final recorded log back to Shani.
• Interact with the Raider Tower Terminal:
- Go to the old Raider Tower located to the north of the Maintenance Hanger.
- Climb to the top and use the computer terminal there.
• Search near the Maintenance Hanger:
- Head down to the area surrounding the Maintenance Hanger to look for physical signs of the patrol
(discarded gear or blood trails).
Investigate Scout Remains:
- Find the actual remains/bodies left by the scouts.
- Search them to find the Scout Patrol Note.
Extraction:
- You must successfully extract with the Scout Patrol Note in your inventory.
Test Case
Objective
• Deliver a Hornet Driver to Apollo
• Deliver a Fireball Burner to Apollo
• Destroy a Firefly
• Deliver a Firefly Burner to Apollo
• Deliver a Hornet Driver to Apollo
• Deliver a Fireball Burner to Apollo
• Destroy a Firefly
• Deliver a Firefly Burner to Apollo
Reward
• 1× Fireworks Box Blueprint
• 3× Seeker Grenade
• 3× Blaze Grenade
• 1× Fireworks Box Blueprint
• 3× Seeker Grenade
• 3× Blaze Grenade
Map
• Any
• Any
How to Complete
• Hunt Flying ARC Units:
- You need to track down and destroy three specific types of machines: a Hornet, a Fireball, and a Firefly.
• Collect the Components:
- Hornet Driver: Destroy a Hornet (the standard flying blaster drone) and pick up its driver unit.
- Fireball Burner: Destroy a Fireball (the orange suicide drone). When it explodes, it drops the Fireball Burner as a heavy weapon/item you can pick up.
- Firefly Burner: Destroy a Firefly (a larger, more advanced flying unit). Like the Fireball, it will drop its Firefly Burner core upon destruction.
• Extraction:
- You must successfully extract while carrying these items.
- Note that "Burners" are often treated as heavy objects or temporary weapons, so ensure you
have the required quest item version in your inventory.
Settled in Full
Objective
• Destroy a Bastion
• Deliver a Bastion Cell to Tian Wen
• Destroy a Bastion
• Deliver a Bastion Cell to Tian Wen
Reward
• 30× Raider Tokens
• 30× Raider Tokens
Map
• Any
• Any
How to Complete
• Locate a Bastion:
- Find a Bastion, a heavy, tank-like ARC machine known for its high health and powerful frontal shields.
- They are typically found guarding major landmarks, Field Depots, or central crossroads in the Dam Battlegrounds.
• Destroy the Bastion:
- This is a tough fight.
- Aim for the glowing cooling vents on its back or the joints of its legs to bypass its heavy front armor.
- Using explosives or high-caliber weapons is highly recommended.
• Obtain the Bastion Cell:
- Once the Bastion is destroyed, it will drop a Bastion Cell.
- This is a high-value, heavy power source that you must pick up from the wreckage.
Extraction:
- You must successfully extract with the Bastion Cell in your inventory.
- Because the cell is heavy, it may slow you down, making you more vulnerable to other machines
or players during your run to the extraction point.
Waking the Grid
Objective
• Activate the security sensors in one of the Guard Towers
• Start the Security Control Center in Departure Building
• Search for any traces of a security breach in the Arrival Building Data Office
• Activate the security sensors in one of the Guard Towers
• Start the Security Control Center in Departure Building
• Search for any traces of a security breach in the Arrival Building Data Office
Reward
• 1× Tactical Mk. 3 (Revival)
• 3× Vita Shot
• 5× Surge Shield Recharger
• 1× Tactical Mk. 3 (Revival)
• 3× Vita Shot
• 5× Surge Shield Recharger
Map
• Spaceport
• Spaceport
How to Complete
• Activate Security Sensors:
- Head to any of the Guard Towers (the tall, standalone watchtowers surrounding the Spaceport perimeter).
- Climb to the top and interact with the console to activate the sensors.
• Start the Security Control Center:
- Enter the Departure Building (the main terminal). Locate the Security Control Center room,
usually a room filled with monitors and servers.
- Interact with the main terminal to bring the systems back online.
• Search for Breach Traces:
- Go to the Arrival Building (the opposite terminal).
- Navigate to the Data Office on the upper levels.
- Search the computer desks and filing cabinets for specific documents or digital logs that indicate a security breach.
Extraction:
- Once all three objectives are complete, you must successfully extract to bring the gathered intel back to Speranza.
Fragmented Logs
Objective
• In either of the Robotic Sandbox control rooms, repair the out-of-service terminal with 1 Electrical Component
• Enable the power in any of the conduit backrooms near the Robotic Sandboxes
• Boot the main frame data terminal in the Cultural Archives service backrooms
• In either of the Robotic Sandbox control rooms, repair the out-of-service terminal with 1 Electrical Component
• Enable the power in any of the conduit backrooms near the Robotic Sandboxes
• Boot the main frame data terminal in the Cultural Archives service backrooms
Reward
• 3× Showstopper
• 3× Trailblazer
• 3× Showstopper
• 3× Trailblazer
Map
• Stella Montis
• Stella Montis
How to Complete
• Repair the Sandbox Terminal:
- Head to the Robotic Sandbox area.
- Enter one of the elevated control rooms and locate the "out-of-service" terminal.
- You must have 1 Electrical Component in your inventory to interact with it and perform the repair.
• Enable Power:
- Look for the conduit backrooms (maintenance areas) located near the Robotic Sandboxes.
- Find the breaker box or power lever and interact with it to enable the power.
• Boot the Mainframe:
- Travel to the Cultural Archives.
- Navigate to the service backrooms (the staff-only areas behind the main library/storage).
- Locate the main frame data terminal and interact with it to "boot" the system and finalize the data retrieval.
• Extraction:
- After booting the terminal, the mission is complete. Extract successfully to secure your progress.
Furtive Meetings
Objective
• Search for the secret meetings spot under a staircase in the Medical Research Area
• Find the secret meeting spot near the ventilation shaft between Robotic Sandbox B and Seed Vault
• Find the secret meeting spot at the bottom of the staircase connecting Cultural Archives and Seed Vault
• Search the meeting area
• Bring the Secret Meeting Info to Shani
Reward
• 1× Aphelion
• 5× Energy Clip
• 1× Aphelion
• 5× Energy Clip
Map
• Stella Montis
• Stella Montis
How to Complete
• Medical Research Area:
- Head to the Medical Research section.
- Look for a staircase and check the crawlspace or corner directly underneath it to trigger the first meeting spot objective.
• Between Sandbox B and Seed Vault:
- Navigate to the area connecting Robotic Sandbox B and the Seed Vault.
- Look for a large ventilation shaft; the meeting spot is located in the immediate vicinity of this vent.
• Archives/Seed Vault Staircase:
- Find the staircase that connects the Cultural Archives to the Seed Vault.
- Go to the very bottom of these stairs to find the final meeting spot.
• Search the Meeting Area:
- At one of these locations (usually the last one you visit), you will find a prompt to search the area for physical evidence.
- Interact with it to pick up the Secret Meeting Info.
• Extraction:
- You must successfully extract with the Secret Meeting Info in your inventory.
Last Entry
Objective
• Find and access the right work station in the Seed Vault for clues
• Search for the hidden key in the adjacent room
• Search the Seed Vault and unlock the seed deposit box
• Search the seed deposit box
• Bring the Official Shutdown Documentation to Shani
• Find and access the right work station in the Seed Vault for clues
• Search for the hidden key in the adjacent room
• Search the Seed Vault and unlock the seed deposit box
• Search the seed deposit box
• Bring the Official Shutdown Documentation to Shani
Reward
• White Indigo (Warden Color)
• 1× Yellow Light Stick Blueprint
• White Indigo (Warden Color)
• 1× Yellow Light Stick Blueprint
Map
• Stella Montis
• Stella Montis
How to Complete
• Access the Workstation:
- Enter the Seed Vault and search for the correct computer terminal.
- You need to interact with it to find clues regarding the facility's shutdown.
• Find the Hidden Key:
- Head into the adjacent room (the room right next to the workstation).
- Search the desks, shelves, or lockers to find the Hidden Key required for the vault.
• Unlock the Deposit Box:
- Return to the main area of the Seed Vault.
- Locate the specific seed deposit box (a reinforced storage unit) and use the key to unlock it.
• Retrieve the Documents:
- Search the opened deposit box to pick up the Official Shutdown Documentation.
• Extraction:
- You must successfully extract with the documentation in your inventory.
Shoring Up Defenses
Objective
• Destroy 5 Wasps
• Destroy 3 Fireflies
• Use 1 ARC Alloy to reinforce the Raider structure on top of any Stacking Yard crane
• Board up shuttered windows in the hotel
• Destroy 5 Wasps
• Destroy 3 Fireflies
• Use 1 ARC Alloy to reinforce the Raider structure on top of any Stacking Yard crane
• Board up shuttered windows in the hotel
Reward
• 3× Barricade Kit
• 3× Lure Grenade Trap
• 6× Seeker Grenade
• 3× Barricade Kit
• 3× Lure Grenade Trap
• 6× Seeker Grenade
Map
• Riven Tides
• Riven Tides
How to Complete
• Hunt Flying Units: You need to take down several airborne ARC machines:
- Destroy 5 Wasps: These are common flying units often found patrolling open fields or near outposts.
- Destroy 3 Fireflies: These are larger, more advanced flying units. Look for them hovering higher up or
guarding industrial zones.
• Reinforce the Crane:
- Head to the Stacking Yard. You must climb to the very top of one of the massive industrial cranes.
- Ensure you have 1 ARC Alloy in your inventory, then interact with the Raider structure on the crane to "reinforce" it.
• Board up the Hotel:
- Travel to the Hotel building.
- Locate the ground-floor or balcony windows that have shutters.
- Interact with them to board up the windows (this usually requires a short interaction timer).
• Extraction:
- Once all tasks are complete, head to an extraction point to secure your mission progress.
Battening Down
Objective
• Photograph the cracks forming in the seawall
• Sample the shoreline near the hotel beach
• Fix the leaking oil pipe in the northeast
• Photograph the cracks forming in the seawall
• Sample the shoreline near the hotel beach
• Fix the leaking oil pipe in the northeast
Reward
• 1× Riven Tides Hotel Keycard No. 107
• 3× Smoke Grenade Trap
• 1× Riven Tides Hotel Keycard No. 107
• 3× Smoke Grenade Trap
Map
• Riven Tides
• Riven Tides
How to Complete
• Photograph the Seawall:
- Head to the coast and locate the large seawall (the concrete barrier against the water).
- Look for visible cracks in the structure.
- Use your in-game camera to take a photo of the damaged sections.
• Sample the Shoreline:
- Move to the beach area near the Hotel.
- Approach the water's edge and interact with the ground/water to collect a shoreline sample.
• Fix the Leaking Oil Pipe:
- Travel to the northeast section of the map.
- Look for an industrial pipe emitting black smoke or dark liquid.
- You will need to interact with the leaking section to perform the repair (ensure you have basic materials
like Wires or Scrap just in case they are required).
• Extraction:
- Once all three tasks are finished, proceed to an extraction point to bring the data and samples back to Speranza.
Line in the Sand
Objective
• Find out why the train never reached Marano Station
• Find out who orchestrated the robbery
• Find out where the thruster valves were stashed
• Search the basement of the merchant's nearby apartment
• Find out why the train never reached Marano Station
• Find out who orchestrated the robbery
• Find out where the thruster valves were stashed
• Search the basement of the merchant's nearby apartment
Reward
• 2× Exodus Modules
• 2× Magnetic Accelerator
• 2× Magnetron
• 2× Exodus Modules
• 2× Magnetic Accelerator
• 2× Magnetron
Map
• Buried City
• Buried City
How to Complete
• Investigate the Train:
- Follow the tracks leading toward Marano Station.
- You will find the stalled or derailed train nearby; inspect the wreckage to find out why it never arrived.
• Identify the Thieves:
- Search the immediate area around the train for clues (notes, distinct raider gear, or markings) to identify
the group that orchestrated the robbery.
• Track the Valves:
- Your investigation will lead you to information about the Thruster Valves.
- Follow the markers or clues to find where the stolen valves were originally stashed after the heist.
• Search the Merchant's Basement:
- Head to the merchant's apartment located near the station or the train tracks.
- Locate the entrance to the basement and search the interior to find the stolen cargo or further evidence.
• Extraction:
- Once you have gathered all the intel and searched the basement, extract successfully to complete the mission.
Collision Course
Objective
• Destroy a Comet
• Deliver a Comet Igniter to Tian Wen
• Destroy a Comet
• Deliver a Comet Igniter to Tian Wen
Reward
• 1× Canto I
• 1× Extended Medium Mag III
• 1× Muzzle Brake II
• 1× Canto I
• 1× Extended Medium Mag III
• 1× Muzzle Brake II
Map
• Any
• Any
How to Complete
• Locate a Comet:
- Find a Comet, a fast-moving ARC unit known for its dashing attacks and high mobility.
- They are typically found in open fields or patrolling major road networks in the Dam Battlegrounds.
• Destroy the Comet:
- These units move very quickly and often try to ram you.
- Use weapons with good tracking or high fire rates.
- Aim for the glowing propulsion vents on its sides or rear to disable its speed before finishing it off.
• Obtain the Comet Igniter:
- Once the Comet is destroyed, it will drop a Comet Igniter.
- Pick this up from the mechanical wreckage.
• Extraction:
- You must successfully extract with the Comet Igniter in your inventory to secure the mission progress.
Safe Harbor
Objective
• Find the clue left by the restaurant kitchen staff
• Find the area portrayed in the sketch
• Dig up the buried part
• Deliver the Precision Gimbal to Tian Wen
• Find the clue left by the restaurant kitchen staff
• Find the area portrayed in the sketch
• Dig up the buried part
• Deliver the Precision Gimbal to Tian Wen
Reward
• 1× Surge Coil
• 1× Heavy Gun Parts
• 1× Horizontal Grip
• 1× Surge Coil
• 1× Heavy Gun Parts
• 1× Horizontal Grip
Map
• Riven Tides
• Riven Tides
How to Complete
• Search the Restaurant Kitchen:
- Head to the urban area (usually the Buried City) and locate the restaurant.
- Search the kitchen area for a hidden note or a sketch left by the staff.
• Locate the Sketched Area:
- Look at the sketch in your inventory or quest log.
- It will depict a specific landmark nearby—typically a unique tree, a piece of playground equipment,
or a specific corner of a courtyard.
• Dig Up the Part:
- Go to the exact spot shown in the sketch.
- You will see an interaction prompt to "Dig" in the dirt or sand.
• Obtain the Precision Gimbal:
- Digging will reveal the Precision Gimbal. Pick it up and ensure it is in your inventory.
• Extraction:
- You must successfully extract with the gimbal to complete the mission.
A Wrench in the Works
Objective
• Search the buses near the western gate
• Locate the stash of sabotage supplies hidden at the Water Towers
• Search the buses near the western gate
• Locate the stash of sabotage supplies hidden at the Water Towers
Reward
• Radio Renegade Outfit (Yellow Color)
• 5× Mechanical Components
• 3× Mod Components
• Radio Renegade Outfit (Yellow Color)
• 5× Mechanical Components
• 3× Mod Components
Map
• Spaceport
• Spaceport
How to Complete
• Search the Buses:
- Head to the Western Gate of the facility (typically on the Spaceport or Dam map).
- You will find a group of abandoned buses nearby.
- Search inside and around them for documents or a specific quest item.
• Locate the Sabotage Stash:
- Travel to the Water Towers landmark.
- Search the area at the base of the towers or among the nearby crates to find the stash of sabotage supplies.
- It is usually tucked away in a hidden corner or under a metal overhang.
• Extraction:
- Once you have located the stash and the objective updates, proceed to an extraction point to
successfully complete the mission.
Copyright @2026 GameplayLabz. All rights reserved